Outline
Weekly Schedule
| Week | Module |
|---|---|
| 1 | Version Control with Git |
| 2 | HTML Fundamentals |
| 3 | CSS Fundamentals |
| 4 | CSS Layouts |
| 5 | JavaScript Fundamentals |
| 6 | JavaScript Fundamentals |
| 7 | React Fundamentals |
| 8 | React Fundamentals |
| 9 | Reading Week |
| 10 | Serverless Architecture |
| 11 | Working with Databases |
| 12 | Building APIs |
| 13 | Building APIs |
| 14 | Scheduling Tasks |
| 15 | Final |
Assesment
| Module | Weight |
|---|---|
| Assignment 01 | 20% |
| Assignment 02 | 20% |
| In-class Activities | 20% |
| Final | 40% |
Git
For every software project, we need a tool to keep our files safe, retain a history of changes, attribute those changes to their authors, and have a seamless collaboration between team members. We also want the tool to be fast and easy to use. Git delivers all that.
A Git project is referred to as a "repository," which contains the complete history of the project from the beginning. A repository consists of individual snapshots called "commits." A single commit includes:
The project tree
A structure of nested files and directories representing a complete state of the project:
project
│   README.md
│   file001.txt
│
└───folder1
│   │   file011.txt
│   │   file012.txt
│   │
│   └───subfolder1
│       │   file111.txt
│       │   file112.txt
│       │   ...
│
└───folder2
    │   file021.txt
    │   file022.txt
The "author"
Name, email address, and date/time indicating who made the changes that resulted in this project state and when.
The "committer"
The same information about the person who added this commit to the repository (which may be different from the author).
Note: author and committer will refer to the same person if you're working on a Git project alone. In group projects, however, they could refer to different people (or even bots!).
A "commit message"
Text used to comment on the changes made by the commit.
The following figure shows a Git project containing one branch (Main) and 4 snapshots (commits).
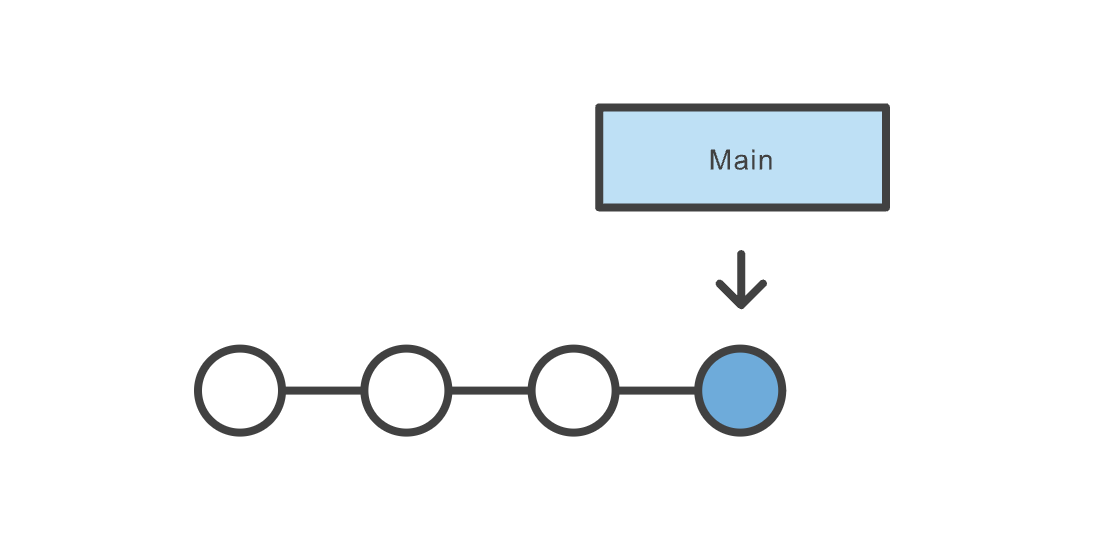
Image Credit: Atlassian
Download and Install Git
First, there's a chance you already have Git installed on your system. To make sure, open up a Terminal (command-line) and try this command:
git --version
If you see a Git version showing up, you can skip this step. If not, refer to this tutorial on how to install Git based on your operating system.
Turning a Folder Into a Git Project
In order to turn a folder into a Git project, first cd to the folder in your Terminal: cd /your/folder. Then run git init. If successful, the folder is now tracked via Git. You should also be able to see a hidden folder named .git in your root directory: ls -la.
Create Snapshots (commits)
In order to create snapshots in a Git project, you need to first stage your changes, as commits only create snapshots of the changes already staged within a project. To stage a file, run git add <file-name>. You can also use the handy git add -A command to stage everything in the project. To create a snapshot of staged files and folders, use the git commit -m "commit message" command. The commit message could be anything, but it's highly recommended to put something meaningful, especially if you're working in a team, as it makes it easier to follow changes later.
Check the Status of a Project
You can use the git status to check the status of a project. Note that you need to be inside the Git project for the command to work. Here's a sample output of the command:
On branch main
Your branch is up to date with 'origin/main'.

Changes not staged for commit:
  (use "git add <file>..." to update what will be committed)
  (use "git restore <file>..." to discard changes in working directory)
        modified:   git-101/README.md

Untracked files:
  (use "git add <file>..." to include in what will be committed)
        git-101/images/

no changes added to commit (use "git add" and/or "git commit -a")
It tells you which branch you are currently on (main in this case); files not staged yet; and files not being tracked at the moment. To stage a file, or start tracking a file, use the git add <file-name> command.
Branches
When you first turn a directory to a Git project, Git will create a branch named main for you (you can list your branches by using the git branch command). Changes you make (almost) always happen on a branch. A branch is simply a pointer to a commit. That commit in turn can point to a parent commit, then another parent commit, etc.

Image Credit: Atlassian
Branches are very important when working in a team. We create branches (or branch off an existing branch, as they say) to work on a new feature, bug fix, etc. while at the same time not interfering with other teammates' works on other branches. When finished, we will merge our branch to a main branch. Note that I said a main branch and not the main branch. In a real-world scenario, typically, there are multiple main branches associated with different environments (for instance: dev, staging, and production). A main branch is a branch that once merged into, will usually trigger a deployment process and change the state of an environment.
In order to create a branch, you can use the git branch <branch-name> command. Note that this will not change the current branch for you. You also need to checkout to the branch using the git checkout <branch-name>. There's also a handy command: git checkout -b <branch-name> which will create the branch and checkout to it in one step.
Remote Repository
Remote repository is a server that holds a central copy of your local repository. A central or remote repository is key to working efficiently in a team, as each team member can pull the latest changes from the central repository and push their changes to it. The following figure shows a central (remote) repository and two collaborators working as a team.

Image Credit: Atlassian
It's convention to name the remote repository origin. To pull the latest changes from the remote repo, use git pull origin <branch-name>, and to push your changes to the remote repo, use git push origin <branch-name>.
Pull Request
A Pull Request (or PR for short) is request to merge your branch (including your latest changes) to a remote branch. Although you may be able to push directly into a branch without creating a PR first, it's always recommended to do so when you're working in a team, as PRs allow collaborators to discuss the changes before merging.
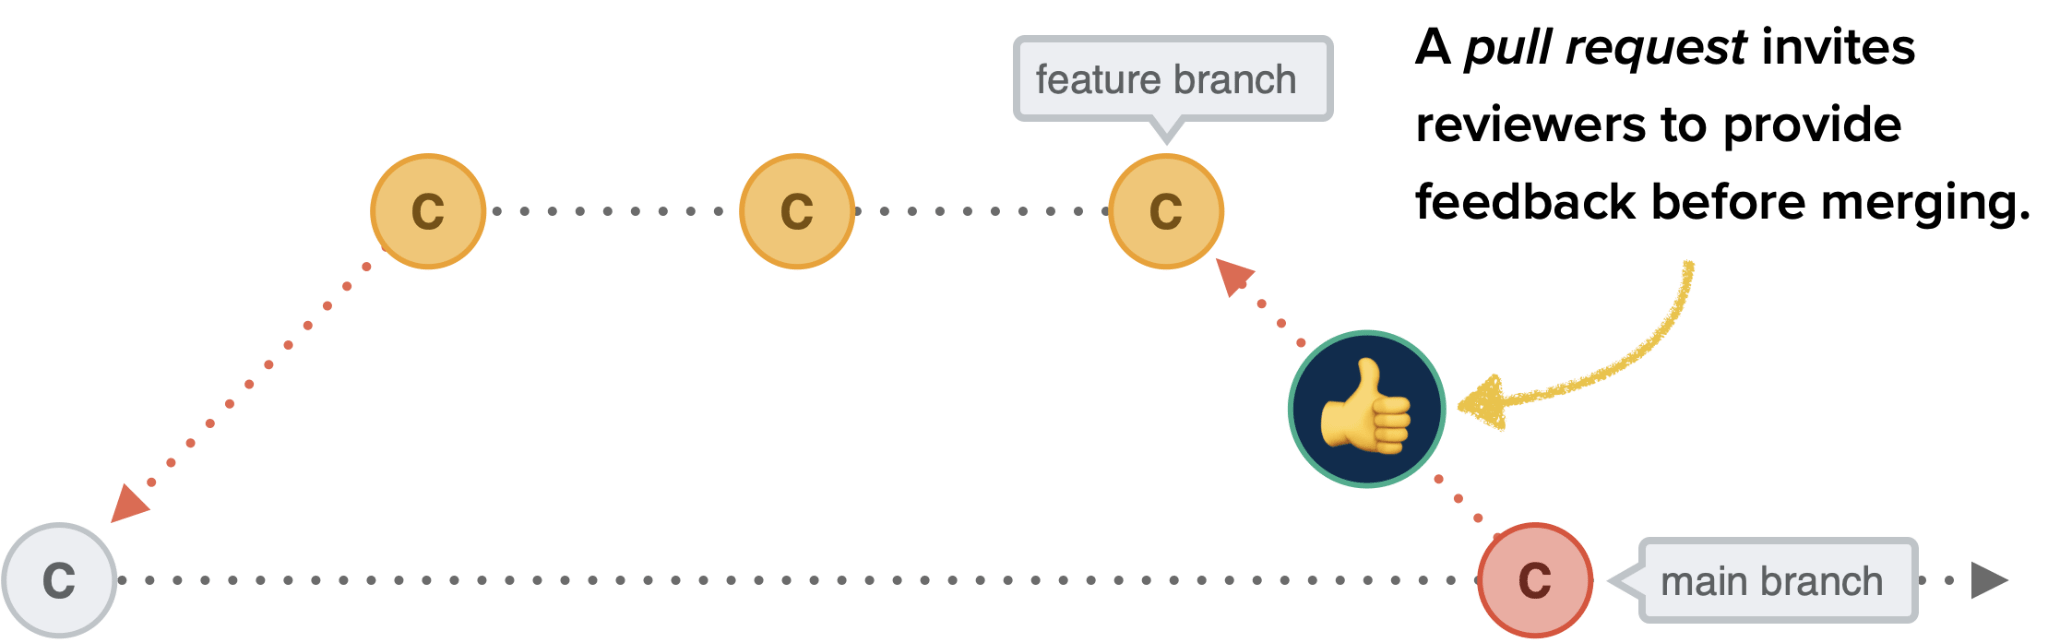
Image Credit: CSS Tricks
Most-used Commands in This Course
# initialize a git repository
git init

# add (stage) all changes
git add -A

# commit staged changes with a message
git commit -m "commit message"

# create a new branch and checkout into it
git checkout -b <branch-name>

# change the current branch to an existing branch
git checkout <branch-name>

# delete a branch
git branch -D <branch-name>

# see commit logs
git log

# see logs in one line
git log --online

# see status of the current local repository
git status

# see the list of local branches
git branch

# see the list of both local and remote branches
git branch -a

# rebase a branch with another one
git rebase <branch-name>

# see remote repositories linked to the current local repository
git remote -v

# add a new origin (remote repository)
git remote add origin <origin-url>

# pull the latest changes from the remote repository
git pull origin <branch-name>

# push a branch to the remote repository
git push origin <branch-name>

# cache GitHub credentials
git config --global credential.helper 'cache --timeout=36000'

# remove git cache
git rm -r --cached .

# set upstream (default remote branch) for a local branch
git push -u origin <branch-name>

# revert a commit
git revert <commit-hash>

# config username and email for a git project
git config user.name "username"
git config user.email "email"
Git cheat sheet
The commands discussed above--and more--are summarized in this cheat sheet available to download.
HTML
HTML (HyperText Markup Language) defines the meaning and content of a webpage. Other technologies help with the presentation and style of a page (CSS), and behaviour and functionality (JavaScript). We'll cover these technologies later in the course.
HTML is a declarative language. There's no logic. It's just for declaring (or annotating) the different pieces of content on a webpage:
- This is an image
- That's a paragraph
- Those are checkboxes
- Here's a table
HTML uses tags to declare content. Most tags (not all) are a pair of opening and closing tags. Take the paragraph tag as an example: opening tag <p> and closing tag </p>. Here's how to declare a paragraph in HTML:
<p>This is a paragraph</p>
The following figure shows the anatomy of an HTML tag (<p> in this case)
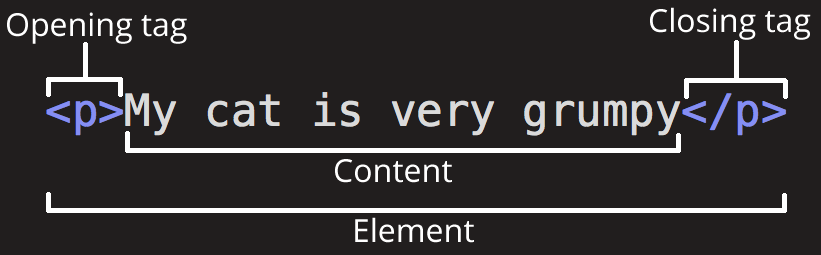
Image Credit: Mozilla
The name inside a tag is case-insensitive. So the above example could also be written as:
<p>This is a paragraph</p>
It's convention to use lower-case letters for tag names. But if you decide otherwise, be consistent (either lower or uppercase letter, and not a combination of both).
There are some elements that don't accept anything as content, so they don't have a closing tag. They're called self-closing or void elements. For example:
<img src="bvc.png" alt="bvc logo" />
Tags can be nested:
<p>This is <strong>important</strong></p>
In a nutshell, HTML provides meaning to our content. Take the following piece from the New York Times, for instance:
Alzheimer’s Prediction May Be Found in Writing Tests

IBM researchers trained artificial intelligence to pick up hints of changes in language ahead of the onset of neurological diseases.
Here's how we can give it some meaning with HTML tags:
<article>
  <h1>Alzheimer’s Prediction May Be Found in Writing Tests</h1>
  <p>
    IBM researchers trained artificial intelligence to pick up hints of changes
    in language ahead of the onset of neurological diseases.
  </p>
</article>
Comments
Anything between <!-- and --> will be considered as a comment and will not show up on the page. Bundler tools, such as Webpack, are smart enough to remove comments to prepare your application for production. We will see this in action when we get to the React part of the course. However, removing comments is perhaps the simplest thing that tools like Webpack do.
<!--This is a comment-->
<!-- It could also
be in multiple
lines -->
HTML Attributes
HTML elements can accept multiple attributes. This is how we add an attribute to an HTML element:
<p attribute-name="attribute-value">...</p>
The following figure shows an attribute inside a <p> tag.

Image Credit: Mozilla
There are two kinds of attributes:
Global attributes are the ones that can be added to any element. Examples of Global attributes are the id and class attribute. These attributes become crucial when we get to the CSS and JavaScript part of the course.
There are also attributes that only apply to certain elements. For example, the href attribute applies to the <a> or Anchor element. You will find more information about HTML attributes here.
Images
We can define images and illustrations using the <img> void element.
<img src="PATH_TO_THE_IMAGE" alt="ALTERNATE_TEXT" />
The alt attribute will show up if, for any reason, the browser cannot show the image. For instance, if the file path is wrong or there is a problem with the connection.
Note that for the src attribute, you can use both relative (if the file is on your servers) and absolute paths, as discussed here.
Links
Links are defined by the <a> tag. The href attribute is where the address (link) goes, and the target attribute specifies where the link opens.
<a href="https://www.youtube.com/watch?v=dQw4w9WgXcQ" target="_blank"
  >Complete HTML Course</a
>
_blank opens the link in a new tab.
Relative vs Absolute Links
When it comes to linking a file or a page on your website, there are usually two ways to do it:
Relative paths start from your current location, whereas Absolute paths are the full URL of a file.
<!-- using relative path -->
<!-- it goes one level up (../) and then inside the "about" folder and then "index.html -->
<a href="../about/index.html">About</a>

<!-- absolute path starting with the schema (https://) -->
<a href="https://mywebsite.com/about/index.html">About</a>
Inline vs Block Elements
A block-level element, like <div></div> takes up the full width of the page and has top and bottom margins. An inline element, like <span></span> or <strong></strong>, on the other hand, does not start on a new line and only takes up as much width as necessary.
Take the img tag as an example. The tag itself is an inline element, but with the help of a (rather) new element figure, we can have a block-level image. It also gives us the ability to add a caption.
<figure>
  <img src="PATH_TO_THE_IMAGE" alt="ALTERNATE_TEXT" />
  <figcaption>Figure Caption</figcaption>
</figure>
We may put inline elements inside other inline or block elements. But it's not recommended to put block elements inside inline elements.
<!-- good -->
<p>I <i>DO</i> like banana pie!</p>

<!-- bad -->
<span>
  <div>I <i>DO</i> like banana pie!</div>
</span>
Generic Elements
It's a very good practice to find an appropriate HTML tag for your content. If you are writing a paragraph, it's best to use the <p></p> element, for instance; and if the paragraph is part of an article, it's best to put it inside the <article></article> tag. These so called semantic elements help your website to become more optimized when it comes to search engines.
However, in case you don't come up with an appropriate elemenet, you can use the generic elements. For block-level elements, you can use the <div></div> element, and for inline elements, you can use the <span></span> element.
Lists
There are mainly two types of lists:
- Unordered (defined with the
<ul>tag) - Ordered (defined with the
<ol>tag)
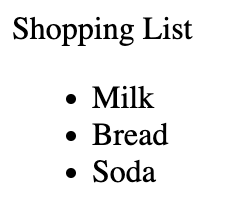
<!-- unordered list -->
<p>Shopping List</p>
<ul>
  <li>Milk</li>
  <li>Bread</li>
  <li>Soda</li>
</ul>
Result:
<!-- ordered list -->
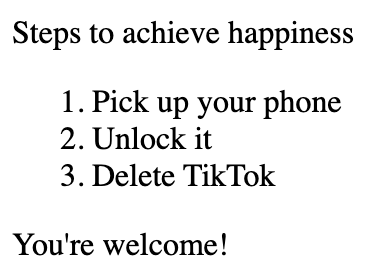
<p>Steps to achieve happiness</p>
<ol>
<li>Pick up your phone</li>
<li>Unlock it</li>
<li>Delete TikTok</li>
</ol>
<p>You're welcome!</p>
Result:
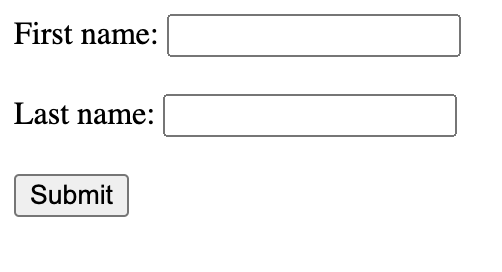
Forms
Forms are the way to gather data from the user. There is a wide range of available elements for HTML forms which we'll cover at several points during the course. Here's a simple example:
<form>
  <!-- label "for" attribute matches the "id" attribute of the input it refers to -->
  <!-- this makes it possible to click on the label and focus into the input element (the cursor moves to the input) -->
  <label for="fname">First name:</label>
  <input type="text" id="fname" name="fname" />
  <br /><br />
  <label for="lname">Last name:</label>
  <input type="text" id="lname" name="lname" />
  <br /><br />
  <!-- input of type "submit" creates a button which when clicked will submit the form to whatever address we specify as "action" inside the <form> tag (here we have none) -->
  <input type="submit" value="Submit" />
</form>
Result:
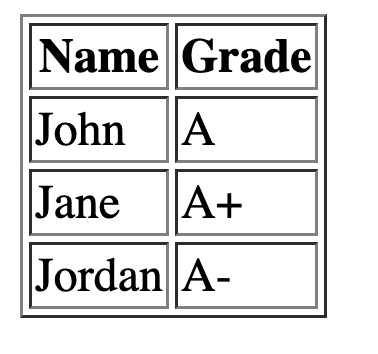
Tables
We use tables only when we want to show tabular data. That might seem like a given, but there was a time when people would use tables for designing the layout of a page. That is no longer the case. We design the layout using CSS which we will discuss later. Declaring a table in HTML is fairly easy:
<table border="1">
  <thead>
    <tr>
      <th>Name</th>
      <th>Grade</th>
    </tr>
  </thead>
  <tbody>
    <tr>
      <td>John</td>
      <td>A</td>
    </tr>
    <tr>
      <td>Jane</td>
      <td>A+</td>
    </tr>
    <tr>
      <td>Jordan</td>
      <td>A-</td>
    </tr>
  </tbody>
</table>
Result:
Anatomy of an HTML document
Here's a simple anatomy of an HTML document. You can use it as a project starter.
<!DOCTYPE html>
<html lang="en-US">
  <head>
    <meta charset="utf-8" />
    <meta name="viewport" content="width=device-width" />
    <title>Page Title</title>
  </head>
  <body>
    <!-- content here -->
  </body>
</html>
<head>
In an HTML document, the <head></head> element is where you provide metadata about your page and link your external files such as CSS and JavaScript. The content of the <head></head> element does not show up on the page. The most important elements that go inside the head are:
<title>for declaring the title of the page. This title will show up on the tab of the browser<meta>for providing metadata about the page. These data are used by search engines<link>for linking external CSS files to your page<script>for linking JavaScript (internal or external) to the page
<meta charset="utf-8" />
Sets the character set of the document. UTF-8 supports almost all characters from the majority of languages (English, Spanish, Frensh, Chinese, ...).
<meta name="viewport" content="width=device-width" />
This tag makes sure different screen sizes are not shrinking the page to fit the content. It sets the width of the content to the width of the viewport available on the device. This is important for making sure that the page is responsive and shows up ok in all screen sizes.
<body></body>
All the content that appears on a page goes here.
DOM
A webpage is just a hierarchy of HTML tags, all within <html></html>. This hierarchy makes a tree that is called Document Object Model or DOM. DOM becomes important in writing CSS and JavaScript. The way we structure our content using HTML tags can make it more or less efficient when it comes to the performance of executing CSS or JavaScript code. They also have a direct impact on how good our website will appear on search engines, something known as Search Engine Optimization or SEO.
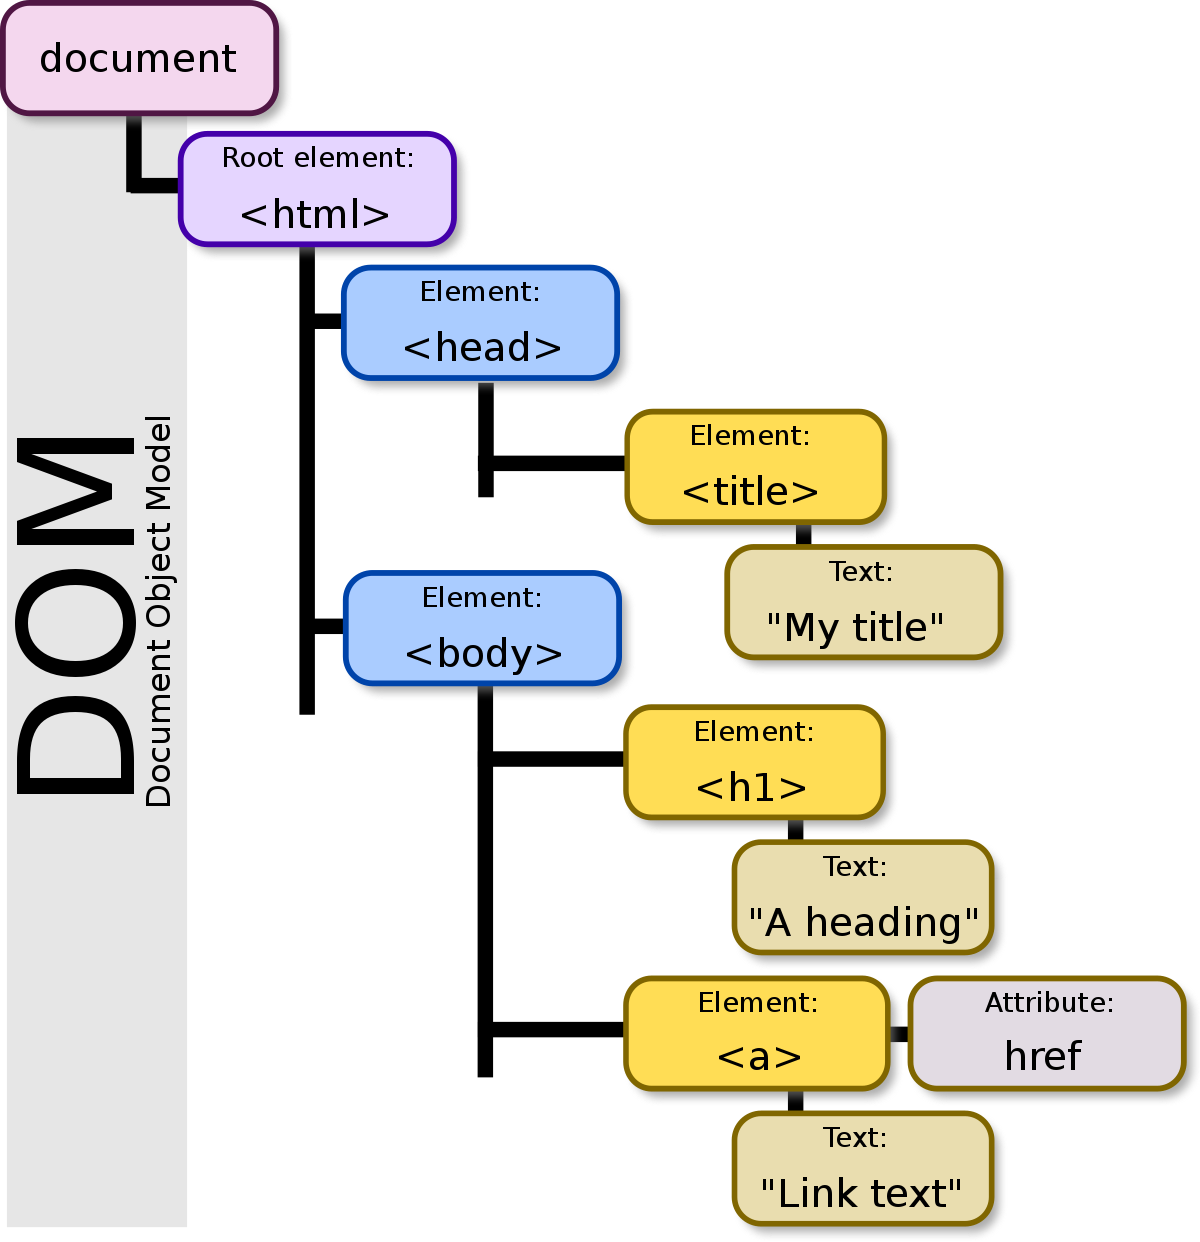
Image Credit: Wikipedia
Browser Developer Tools
All major browsers provide developer tools that help you test and debug your application. You can easily change the content, style, and even behaviour of a webpage using the tool. We'll explore the capabilities in the class. You can open the Developer Console on Google Chrome with Option + ⌘ + J (on macOS), or Shift + CTRL + J (on Windows/Linux).
Sample HTML Page
Here's an HTML page including the tags mentioned above (and some more):
<!DOCTYPE html>
<html lang="en-US">
<head>
<meta charset="utf-8" />
<meta name="viewport" content="width=device-width" />
<!-- page description that will appear on search engines as link summary -->
<meta name="description" content="Student grades and complain form" />
<title>BVC Grades</title>
</head>
<body>
<h1>BVC Grades</h1>
<p>
<!-- this image needs to be available in the same directory as this document -->
<img src="bvc-logo.png" width="300" alt="bvc logo" />
</p>
<div>
<table border="1">
<!-- "thead" wraps the headers -->
<thead>
<tr>
<!-- each "th" is a column header -->
<th><strong>First Name</strong></th>
<th><strong>Last Name</strong></th>
<th><strong>Section</strong></th>
<th><strong>Grade</strong></th>
</tr>
</thead>
<tbody>
<!-- each "tr" wraps a row -->
<tr>
<!-- each "td" is a column -->
<td>Jean-Luc</td>
<td>Picard</td>
<td>1</td>
<td>A</td>
</tr>
<tr>
<td>Tasha</td>
<td>Yar</td>
<td>2</td>
<td>A</td>
</tr>
<tr>
<td>William</td>
<td>Riker</td>
<td>1</td>
<td>B+</td>
</tr>
<tr>
<td>Data</td>
<td>-</td>
<td>2</td>
<td>A+</td>
</tr>
</tbody>
</table>
</div>
<h3>Notes</h3>
<ul>
<li>Last day for complaining about your grade is yesterday</li>
<li>Feel free to complain but I'm not gonna read them</li>
</ul>
<form>
<!-- "input" and "label" are inline elements and -->
<!-- we can wrap them in a block element like "p" to break the line -->
<p>
<label for="fname">First Name</label>
<input type="text" id="fname" placeholder="Enter First Name" />
<!-- is the non-breaking space character -->
<label for="lname">Last Name</label>
<input type="text" id="lname" placeholder="Enter Last Name" />
<label for="starship">Starship</label>
<!-- select creates a dropdown -->
<select name="starship" id="starship">
<option value="NCC-1701-D">USS Enterprise (NCC-1701-D)</option>
<option value="NCC-1701-C">USS Enterprise (NCC-1701-C)</option>
</select>
</p>
<p>
<!-- textarea creates a multi-line input -->
<!-- its size is specified with "cols" and "rows" attributes -->
<textarea
id="complain"
cols="30"
rows="10"
placeholder="Your Complain Here"
></textarea>
</p>
<p>
<!-- checked attribute at the end makes the box checked -->
<input type="checkbox" checked />I agree to the fact that my complain
means nothing to you
</p>
<p>
<input type="submit" value="Submit Complain to Nowhere" />
</p>
</form>
</body>
</html>
To test above code, save it as index.html and open it with a browser.
Additional Resources:
CSS
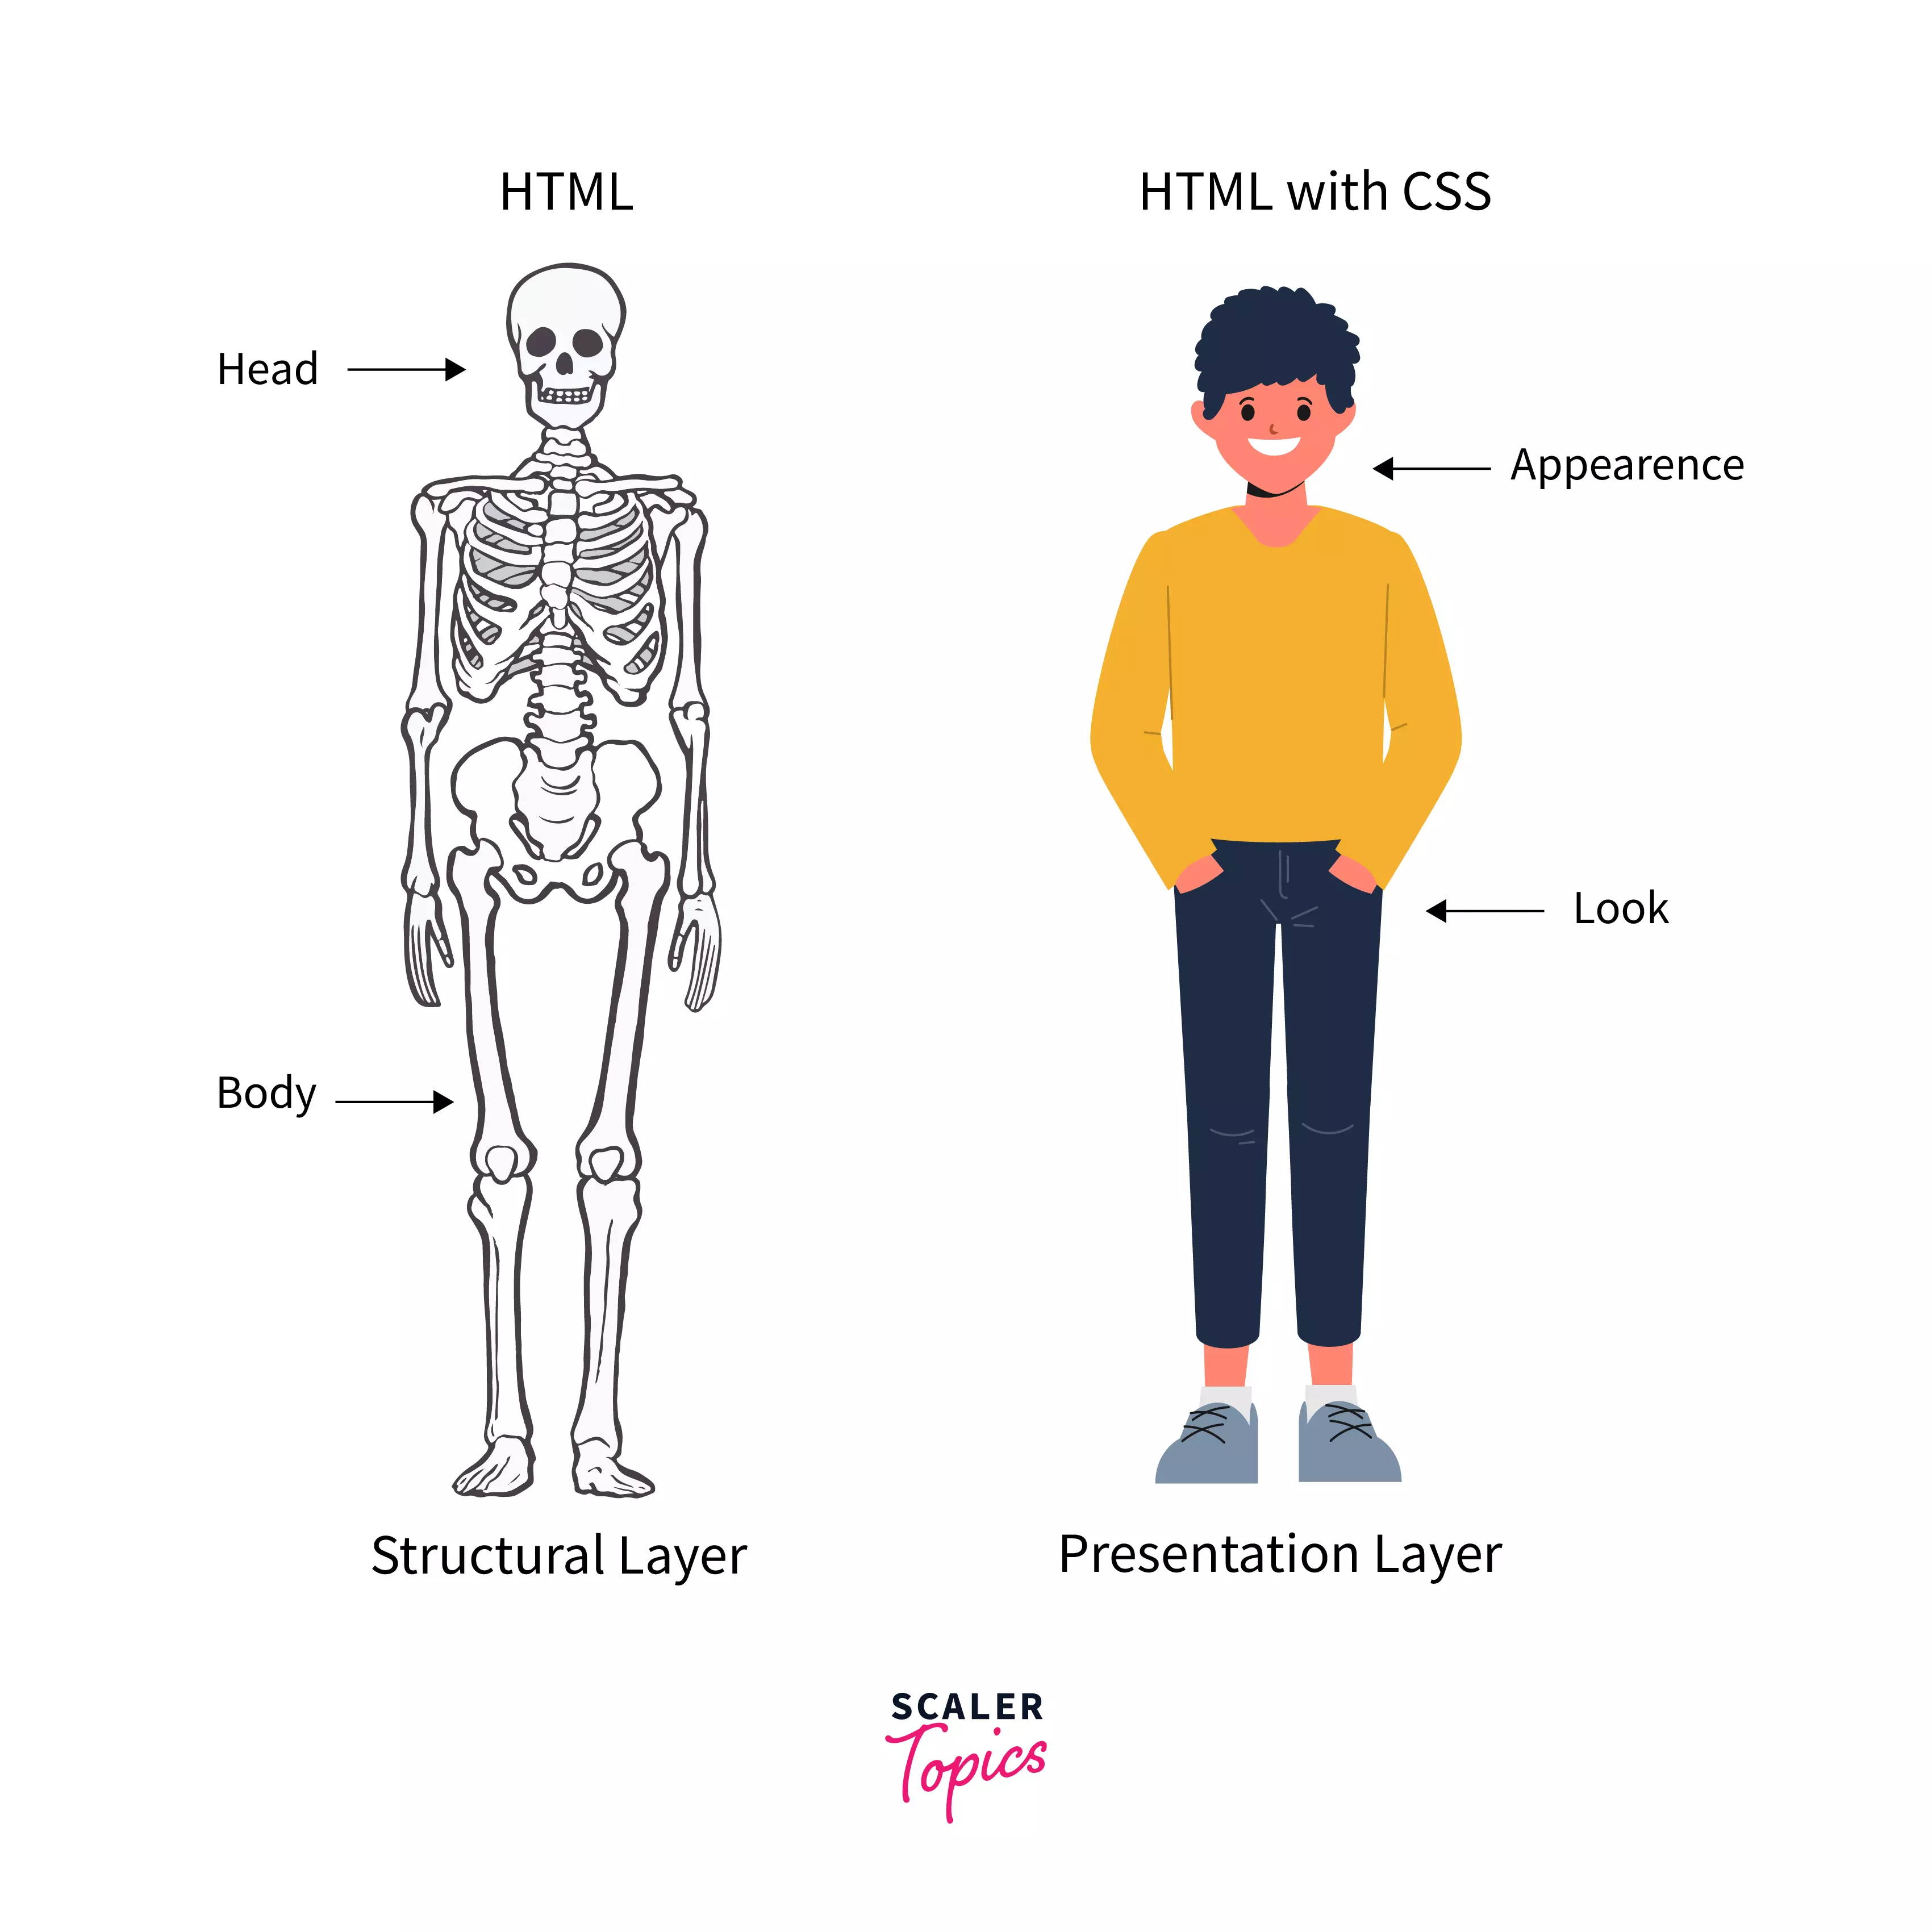
Image Credit: Scaler Topics
CSS (Cascading Style Sheets) is the code that styles web content. CSS uses rulesets to select and apply styles to HTML element(s). The following figure shows the anatomy of a CSS ruleset.
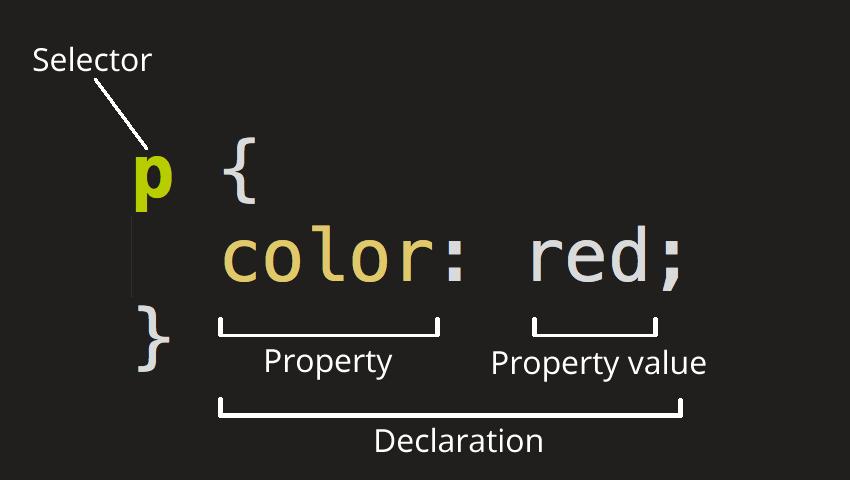
Image Credit: Mozilla
Linking CSS to HTML Documents
There are basically 3 ways to add CSS to webpages:
External
External (also the most common one) is when you have a separate CSS file (or files). We link external CSS files to webpages using the <link> element inside the HTML head element.
<link rel="stylesheet" href="mystyle.css" />
Internal
Internal is when styling happens inside HTML files (rather than separate files). It is also common to add interal CSS inside the HTML head element.
<head>
  <style>
    body {
      background-color: #f1f1f1;
    }
    p {
      text-align: center;
    }
  </style>
</head>
Inline
Inline is when we add styling directly to HTML elements.
<p style="text-align:center">This is a test</p>
In terms of precedence, here is the order:
- Inline
- Internal
- External
That means, in case we have External, Internal, and Inline styling for an element, the Inline styles win. It's a best practice to only stick with one method (Internal, External, or Inline) to avoid conflicts. Also, as mentioned above, External CSS is the most common approach, as it keeps our project clean and provides separation of concerns.
Note: There is another way to add CSS to a webpage and that's called CSS in JavaScript. We will get to that later in the course!
Adding CSS to HTML Elements
In order to add styling to HTML elements, you first need to select that element. There are 4 main ways to do that:
- by tag name
- by tag id
- by tag class
- by attribute name
Each of these methods have their use cases, and based on different scenarios one of them would make more sense to use.
For example, if you need to apply the same style to every <p></p> element, choose styling by tag name:
p {
  text-align: center;
  color: #444;
  padding: 10px 5px;
}
However, you may have a situation in which you need to apply these styles to a group of <p></p> elements, but not all of them. In this case, it makes more sense to use styling by class.
<p class="center-aligned">...</p>
<p class="center-aligned">...</p>
<p class="center-aligned">...</p>
<p class="right-aligned">...</p>
<p class="right-aligned">...</p>
p.center-aligned {
  text-align: center;
}
p.right-aligned {
  text-align: right;
}
Also, you will run into sitations where you only need to apply styles to only one element. That's when styling by id would make more sense.
<p class="special-p">...</p>
<p class="center-aligned">...</p>
<p class="right-aligned">...</p>
p#special-p {
  color: blue;
}
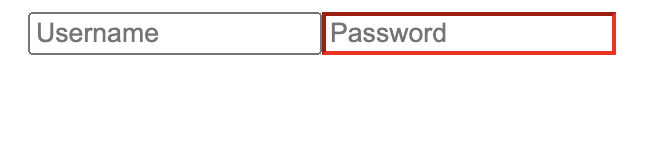
You can also select an element using its attributes:
<input type="text" placeholder="Username" />
<input type="password" placeholder="Password" />
input[type="password"] {
  border-color: red;
}
CSS Specifity
In case of conflicts, browsers adhere to a set of rules to find the winner. These rules are called Specifity. Basically, the more specific and detailed style wins the battle. CSS specifity can get really complicated and there's actually a way to calculate the specifity of an style. Here's the simplified version of the rule (it could get more complicated than this):
Start at 0, add 1000 for
styleattribute, add 100 for each ID, add 10 for each attribute, class or pseudo-class (such as:hover), add 1 for each element name.
For instance, which style do you think wins the following conflict?
div#some-id {
  color: black;
}
div.some-class {
  color: blue;
}
Since selecting an element by ID is more specific than selecting by class, the first style wins. In terms of actual weight in numbers, the first one has the weight of 101 (one tag name and one id) and the second one 11 (one tag name and one class).
When two or more styles have the same weight or specifity, the one that comes later wins.
div.some-class {
  color: blue;
}
div.some-class {
  color: black;
}
Since the second style appears last, it will win the conflict.
You can also mark a declaration with the !important keyword and give it the highest precedence. Other declarations would only be able to compete if they also have been marked with !important:
div#very-specific {
  color: red;
}
div {
  /* this will win */
  color: red !important;
}
div#very-specific {
  /* this will win */
  color: red !important;
}
div {
  color: red !important;
}
Flexbox
Flexbox is a layout method for arranging items in rows and columns. It's become very popular because of its ease of use and compatibility.
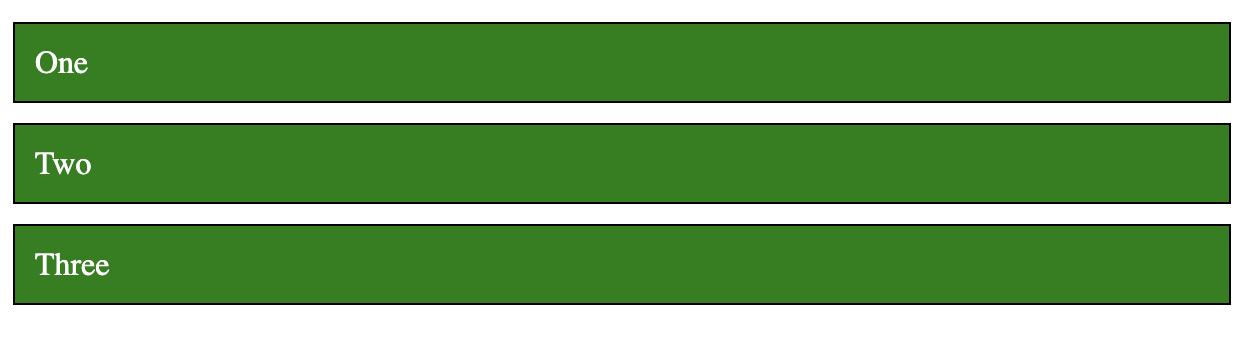
Let's start by a simple example:
<section>
  <div>One</div>
  <div>Two</div>
  <div>Three</div>
</section>
div {
  background-color: green;
  margin: 5px;
  padding: 10px;
  border: 1px solid black;
  color: white;
}
This will results in 3 blocks stack one another:

To make them line up in one row and three columns with equal widths would be a rather challenging task in traditional CSS (using float). But with Flexbox, it's very easy.
First, add display: flex to section (parent), and then add flex: 1 for divs:
section {
  display: flex;
}
div {
  background-color: green;
  margin: 5px;
  padding: 10px;
  border: 1px solid black;
  color: white;
  flex: 1;
}
And that's all we need:

display: flex makes the children inside section flexible so they can share the same line together. flex: 1 is the ratio of space each div will take. When they all have the same ratio, they take up the same amount of space. If we give the first div 2 for flex it will take up half the space, and the other two will share the other half:
div:first-child {
  flex: 2;
}

Now, let's center all the divs without stretching them to fill the line:
section {
  display: flex;
  justify-content: center;
}
div {
  background-color: green;
  margin: 5px;
  padding: 10px;
  border: 1px solid black;
  color: white;
}

Flexbox has two axes: main and cross. justify-content aligns items (children) along the main axis.

Image Credit: Medium
Here's the visualization of the different options for justify-content:
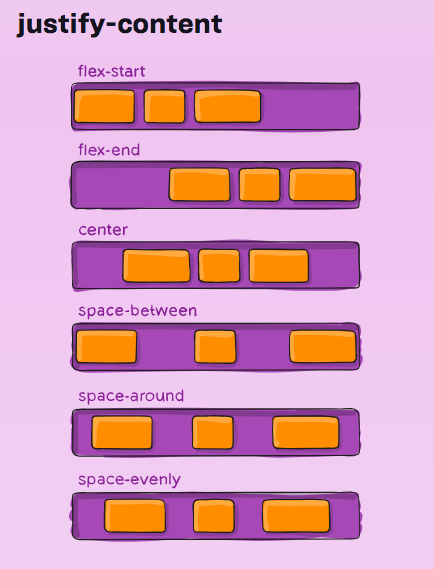
Image Credit: CSS Tricks
We can also change the default direction (row) to column so the divs appear on top of each other:
section {
  display: flex;
  flex-direction: column;
}
Note that the direction of the axes has now changed. main is now vertical and cross horizontal. So, justify-content won't align the items horizontally anymore; it will align them vertically.
To align items along the cross axis, we use align-items.
section {
  display: flex;
  flex-direction: column;
  align-items: center;
}

Flexbox has more properties that you can play around with. Check out this fun game to practice.
Responsiveness
A webpage is responsive when it shows properly on all screen sizes. This usually means the layout has to change in some way to adjust itself to the new screen size.
In CSS, we can apply different styles to elements based on the screen size using media queries. For example, the following example shows how we can style a div with the id content when the screen size is 800px or smaller:
/* default padding */
div#content {
  padding: 30px;
}
/* you can also use "min-width" or a combination of both: */
/* @media only screen and (max-width: 800px) and (min-width: 400px)  */
@media only screen and (max-width: 800px) {
  /* padding only if screen is 800px or smaller */
  /* this has a higher precedence and wins the default padding when */
  /* the condition is met */
  div#content {
    padding: 10px;
  }
}
The div element will have a padding of 30px when the screen is 800px or smaller, and 30px otherwise.
As mentioned before, we are going to use a CSS framework that will take care of all these for us, but it's good to know what is happening behind the sceen.
CSS Frameworks
It usually takes a significant amount of time to write all the CSS of a website from scratch. That's why CSS frameworks are so popular nowadays. A CSS framework is a set of predefined styles ready to get applied to your HTML. Instead of writing your own CSS, you would simply assign predefined CSS classes from a framework.
Aside from the fact that you would save a huge amount of time by using a CSS framework, it would also make your website more robust, as CSS frameworks have been tested against all major browsers and do not contain common mistakes. More often than not, they are open source projects, which means there are houndreds, if not thousands of people contributing to these projects. So, it really makes sense to start with a CSS framework for your website.
Among most popular CSS frameworks, here is a short list:
JavaScript
Case-sensitive Language
Every identifier in JavaScript is case-sensitive, meaning that a variable with the name Foo is different from a variable with the name foo:
let foo = "foo";
console.log(foo); // "foo"
console.log(Foo); // "Uncaught ReferenceError: Foo is not defined"
Comments
You can use // for single-line comments and /* */ for multi-line comments. Comments are not executed and only used for clarifications:
// this has no effect on the execution

/*
This is a multi-line
comment. Again, no effect on the execution
*/
Ending Statements
Although not necessary, it's a good idea to always end your statements with a ;:
let university = "ucalgary";
Dynamiclly Typed
JavaScript is not statically typed, meaning that the true type of a variable is decided in run-time and can change during the execution of the code:
let name = "Alice";
console.log(name); // "Alice"

name = 5; // this is fine
console.log(name); // 5
console.log(name + 10); // 15
Declaring Variables
The const Keyword
A constant is a "variable" that--unlike variables (declared with the let or var keywords)--cannot be overwritten. Once declared, you cannot change its value:
var college = "bow valley";
const university = "ucalgary";
college = "sait"; // allowed
university = "ubc"; // results in "Uncaught TypeError: Assignment to constant variable." error
The let Keyword
The let keyword declares a variable just like the var keyword does; except that the let keyword blocks off the scope of a variable in any {} blocks, such as for and if/else.
var university = "ubc";
if (university == "ubc") {
  var university = "ucalgary";
  console.log(university); // ucalgary
}
console.log(university); // ucalgary
var university = "ubc";
if (university == "ubc") {
  let university = "ucalgary";
  console.log(university); // ucalgary
}
console.log(university); // ubc
Template Strings
Template strings give us a better way to interpolate variables into strings by wrapping them inside ${}:
// old way
console.log(lastName + ", " + firstName + " " + middleName);

// new way
console.log(`${lastName}, ${firstName} ${middleName}`);
They also respect whitespace, making it easy to draw up HTML code.
document.body.innerHTML = `
<section>
  <header>
      <h1>The UCalgary Blog</h1>
  </header>
  <article>
      <h2>${article.title}</h2>
      ${article.body}
  </article>
  <footer>
      <p>copyright | The UCalgary Blog</p>
  </footer>
</section>
`;
Functions
There are multiple ways to create a function in JavaScript. We'll touch on different methods here.
Function Declarations
Function declarations start with the function keyword, folowed by the name of the function, the parameters it receives, an the body wrapped in curly braces {}.
function greetings(name) {
  return `Greetings, ${name}!`;
}
Once declared, you can call it using the function name and the necessary arguments:
console.log(greetings("Alice")); // Greetings, Alice!
Function Expressions
A function expression is just a function declaration assigned to a variable. As functions are first-class citizens in JavaScript, you can assign them to a variable, or even pass them around like a normal variable:
const greetings = function (name) {
  return `Greetings, ${name}!`;
};

console.log(greetings("Alice")); // Greetings, Alice!
One difference between function expressions and declarations is that you can't invoke a function before writing a function expression, but you can do so with function declarations:
console.log(greetings("Alice")); // Error: "Uncaught ReferenceError: Cannot access 'greetings' before initialization"

const greetings = function (name) {
  return `Greetings, ${name}!`;
};
console.log(greetings("Alice")); // Greetings, Alice!

function greetings(name) {
  return `Greetings, ${name}!`;
}
Default Parameters
You can specify a default value for function parameters, just as you would in a language like Python:
const greetings = function (name = "Unknown Person") {
  return `Greetings, ${name}!`;
};

console.log(greetings()); // Greetings, Unknown Person!
Arrow Functions
Arrow functions are a relatively new addition to JavaScript. You can declare functions without using the functions keyword, and sometimes, without having to use the word return:
const greetings = (name) => `Greetings, ${name}!`;

console.log(greetings("Alice")); // Greetings, Alice!
If the function takes more than one argument, you need to use ():
const greetings = (name, lastName) => `Greetings, ${name} ${lastName}!`;

console.log(greetings("Alice", "Smith")); // Greetings, Alice Smith!
In case you want to return more than one statement, you need to wrap the function in {} and use the return keyword:
const greetings = (name, lastName) => {
  if (name === "Alice") {
    return `Greetings, ${name} ${lastName}! How was the Wonderland?`;
  }

  return `Greetings, ${name} ${lastName}!`;
};

console.log(greetings("Alice", "Smith")); // Greetings, Alice Smith! How was the Wonderland?
Objects and Arrays
Objects and Arrays are variables that can contain many values instead of just one. Objects are a container for key/value pairs. In order to access a field inside an object, we use their key:
const myObject = {
  name: "Alice",
  occupation: "Student",
};
console.log(myObject.name); // Alice
console.log(myObject.occupation); // Student
Arrays are containers for a list of values. In JavaScript, the values don't have to be of the same type. To access an element inside an array, we use the array index, starting from 0:
const frontendTech = ["JavaScript", "HTML", "CSS"];
console.log(frontendTech[1]); // HTML
Destructuring Objects
Destructuring objects allows us to retrieve only the values we're interested in, instead of the whole object:
person = {
  name: "Alice",
  occupation: "Student",
};

const { name } = person;
console.log(name); // Alice
person = {
  name: "Alice",
  occupation: "Student",
  age: 25,
  goesTo: "University of Calgary",
  likes: "Programming",
};

const { name, goesTo, likes } = person;
console.log(`${name} goes to ${goesTo} and likes ${likes}.`); // Alice goes to University of Calgary and likes Programming.
We can use destructuring in function parameters too:
person = {
  name: "Alice",
  occupation: "Student",
  age: 25,
  goesTo: "University of Calgary",
  likes: "Programming",
};

const printProfile = ({ name, goesTo, likes }) =>
  `${name} goes to ${goesTo} and likes ${likes}.`;
console.log(printProfile(person)); // Alice goes to University of Calgary and likes Programming.
It also works for nested types:
person = {
  name: "Alice",
  occupation: "Student",
  age: 25,
  goesTo: {
    universityName: "UCalgary",
    universityProvince: "Alberta",
  },
  likes: "Programming",
};

const printProfile = ({
  name,
  goesTo: { universityName, universityProvince },
  likes,
}) =>
  `${name} goes to ${universityName} in the province of ${universityProvince} and likes ${likes}.`;
console.log(printProfile(person)); // Alice goes to UCalgary in the province of Alberta and likes Programming.
Destructuring Arrays
We can also destructure arrays based on their index:
const frontendTech = ["JavaScript", "HTML", "CSS"];
const [firstTech] = frontendTech;
console.log(firstTech); // JavaScript

// note how we ignore the first two using ','
const [, , lastTech] = frontendTech;
console.log(lastTech); // CSS
Object Enhancements
This is the opposite of destructuring. Basicaly, we structure or create new objects this way:
const name = "Alice";
const occupation = "Student";

const enhanced = { name, occupation };
console.log(enhanced.name, enhanced.occupation); // Alice, Student
console.log(enhanced);
We can also attach functions to an object:
const name = "Alice";
const occupation = "Student";
const printProfile = function () {
  return `Name is ${this.name} and occupation is ${this.occupation}`;
};

const enhanced = { name, occupation, printProfile };
console.log(enhanced.printProfile()); // Name is Alice and occupation is Studentf
Note the use of this in the printProfile function. this refers to the object that called the function; in this case: enhanced.
The Spread Operator
The spread operator (...) allows us to break down (spread) contents of an array or object.
const frontendTech = ["JavaScript", "HTML", "CSS"];
console.log(...frontendTech); // "JavaScript", "HTML", "CSS"
Let's copy the frontendTech array to a new one using the spread operator:
const frontendTech = ["JavaScript", "HTML", "CSS"];
const copy = [...frontendTech];
copy[0] = "TypeScript";

const [first] = frontendTech;
const [copyFirst] = copy;
console.log(first); // "JavaScript"
console.log(copyFirst); // "TypeScript"

const shallowCopy = frontendTech;
shallowCopy[0] = "TypeScript";
console.log(frontendTech[0], shallowCopy[0]); // "TypeScript", "TypeScript"
The above example shows how we can deep copy an array using the spread operator and change it later without impacting the main array. Otherwise (as shown in the second part of the example), we'll be doing a shallow copy (reference copy) and every change to either arrays will impact the other one as well.
Let's add a new element to an array:
const arr = ["Python", "Golang", "Java"];
const arr2 = [...arr, "JavaScript"];
console.log(arr.length, arr2.length); // 3, 4
console.log(arr); // ["Python", "Golang", "Java"]
console.log(arr2); // ["Python", "Golang", "Java", "JavaScript"]
The spread operator also works with objects:
const person = {
  name: "Alice",
  occupation: "Student",
  age: 25,
  goesTo: {
    universityName: "UCalgary",
    universityProvince: "Alberta",
  },
  likes: "Programming",
  printLikes() {
    return `${this.name} likes ${this.likes}`;
  },
};
console.log(person.printLikes()); // "Alice likes Programming"

const updatedPerson = {
  ...person,
  // keep everything as is, but replace the "likes" field
  likes: "Hiking",
};
console.log(updatedPerson.printLikes()); // "Alice likes hiking"
Asynchronous JavaScript
Asynchronous programming refers to being able to do something else while waiting for an I/O operation, such as network request, reading files, accessing GPU, etc. As JavaScript is single threaded, asynchronous programming allows us to send network requests without blocking the thread until the request returns. Otherwise, the main thread will be blocked resulting in a browser freeze.
Promises are the core part of asynchronous JavaScript. They allow us to send a network request, and instead of waiting for the response, JavaScript will give us a Promise right away, which we can later use for gathering the result.
The fetch Function
The fetch function is used to asynchronously calling an API endpoint:
// the url returns a random fox image
console.log(fetch("https://randomfox.ca/floof/")); // [object Promise] { ... }
Instead of getting the result of the API call, we received a Promise. The promise is an object that represents whether the async operation is pending, has been completed, or has failed. Basically, the browser will let us know when the result is ready.
The pending promise represents a state before the data has been fetched. We need to chain on a function called then. This function will take in a callback function that will run if the previous operation was successful. In other words, fetch some data, then do something else.
fetch("https://randomfox.ca/floof/")
  .then((res) => res.json())
  .then((json) => json.image)
  .then(console.log) // https://randomfox.ca/images/73.jpg
  .catch(console.error);
First, we send a GET request to receive a random fox image. Then we use then to wait for the response. Whenever the response is ready, the callback function (res => res.json()) will be called, which will convert the result to a JSON format. Whatever the function returns--in this case a JSON object--will be the input for the next then function. We gather the image field from the result and pass it to console.log. If the request fails, the function inside catch will be called. Example of a result from the endpoint:
{
  "image": "https://randomfox.ca/images/44.jpg",
  "link": "https://randomfox.ca/?i=44"
}
Async/Await
Another way to deal with Asynchronous JavaScript is to use async/await. async refers to the function that does something asynchronously, such as sending a network request; and await is for waiting for the response to come back. Some developers prefer this approach as it reads a little bit more easily that a chain of then methods.
Let's convert the previous example to async/await:
const getFox = async () => {
  let res = await fetch("https://randomfox.ca/floof/");
  let json = await res.json();
  let { image } = json;

  console.log(image);
};

getFox(); // https://randomfox.ca/images/76.jpg
Usefule Array Methods
Map
The map() method creates a new array populated with the results of calling a provided function on every element in the calling array. map runs a function for every element inside an array and returns a new array.
let articles = [
  {
    name: "Matrix 4 is Trash",
  },
  {
    name: "Scientists Find Out Birds Can Fly",
  },
];

articles = articles.map((article) => ({
  ...article,
  markup: `<h1>${article.name}</h1>`,
}));
console.log(articles[0].name, articles[0].markup); // "Matrix 4 is Trash", "<h1>Matrix 4 is Trash</h1>"
Filter
The filter() method creates a new array with all the elements that pass the test implemented by the provided function.
const languages = ["JavaScript", "Python", "Go", "Rust", "Java"];

const result = languages.filter((language) => language.length < 5);
console.log(result); // ["Go","Rust","Java"]
localStorage
The Window object has a storage API we can use to store some data on the current domain (address). The data will persist until it's deleted, but will only be available on the browser and the device that were used to store the data. For instance, if you use the localStorage to persist some data on Chrome, it won't be available when you access the same address on Firefox, or on Chrome on a different device. It also won't be available in private mode. That's why ultimately, applications need to have a central backend to store the data across browsers and devices.
With JavaScript, we can store and then retrieve data to and from localStorage like this:
// store some data with the key 'name'
localStorage.setItem("name", "alice");

// retrieve the data with the same key
const name = localStorage.getItem("name");
console.log(name); // alice
More often than not, though, you want to store data with some structure. The most common structure when we work with JavaScript is JSON. In order to store and retrieve data in JSON format, we need to use the JSON.stringify(data) and JSON.parse(data) functions. Example:
// use stringify when storing structured data
const data = { name: "Alice" };
localStorage.setItem("somekey", JSON.stringify(data));

// use parse when reading the data
const item = JSON.parse(localStorage.getItem("somekey"));
console.log(item.name); // Alice
The DOM API
The JavaScript DOM API is the way to interact with the--surprise, surprise--DOM. We use the DOM API to:
- Change the attributes of HTML elements
- Add/Remove new HTML elements
- Add/Remove events, such as mouse click or key down
- ...
Examples:
// get an element with a specific id
document.getElementByID("element-id");

// get an array of elements with a specific class
document.getElementsByClassName("element-class");

// get the first element matching a specific selector
document.querySelector(".test-class");

// create new elements
document.createElement("p");
document.createElement("section");

// set attributes
const img = document.getElementById("image");
img.setAttribute("src", "new-image-src");

// add element
const paragraph = document.createElement("p");
const content = document.createTextNode("Hello!");
paragraph.appendChild(content);

const div = document.getElementById("wrapper");
div.appendChild(paragraph);

// remove element
const element = document.getElementById("removable");
element.remove();

// add events
const button = document.getElementById("submit");
const alarm = () => alert("Clicked");
button.addEventListener("click", alarm);
React
React is a JavaScript library built by Facebook (now Meta) for creating user interfaces. Mainly, there are two advantages of using React:
- We can update the DOM using a declarative approach (as opposed to imperative)
- We can break down the UI into reusable components
Declarative means we only need to be concerned about the states of our application (the data we manage). The rest (updating the DOM and refreshing the page) will be React's problem to solve (and it can solve it pretty efficiently).
React is component-based; that is, we can write reusable components (in separate files) and then use them to build the UI. This helps the project to be more organized and structured. It also keeps our code DRY (Don't Repeat Yourself).
Creating a React Application
There are different ways of creating and starting with a React application. Here, we're going to use a Node.js application called create-react-app. Although you don't need to use this application, it comes with many benefits (from React website):
- Scaling to many files and components
- Using third-party libraries from
npm - Detecting common mistakes early
- Live-editing CSS and JS in development
- Optimizing the output for production
Using create-react-app
Before using create-react-app, make sure you have node, npm, and npx already installed on your system. You can check by using the following commands. If you get a version back and not command not found, then you're good to go.
node --version
npm --version
npx --version
If all is good, you can use this command in your terminal to create a new React application:
npx create-react-app my-new-app
If successful, you will have a new folder named my-new-app in the directory you ran the command in. It has everything you need to start a React application.
JSX
You combine HTML tags and JavaScript and you get yourself JSX. That's basically it. Here's a quick example:
const name = "Josh Perez";
const element = <h1>Hello, {name}</h1>;
Browsers don't support JSX right out of the box, so we need libraries to compile JSX into plain JavaScript so that browsers can understand it. But don't worry. You don't need to be concerned about those libraries. The create-react-app application comes with many pre-installed libraries including JSX parsers.
Components
React uses components. Basically, you break your application (and by application I mean the front-end of your application, since, as I mentioned at the beginning, React is a JavaScript framework for building user interfaces). It's always a good idea to spend some good time designing your application and breaking it into different components before writing your React code.
There are many ways to build a user interface with React. In one of the previous semesters, we gave the students the same project but they all submitted a completely different design at the end. Not 2 applications were the same. That's the beauty of React; you can build your application in many ways. However, not every design is good and efficient. I always say that the more time you spend in the designing and analyzing phase of your application, the more efficient your final application will be; the performance will be better and the whole process will go much smoother. If you jump into the editor and start coding right away, you might think that you are saving time, but in big projects, you will see how important the designing and analyzing phase is.
You can consider Components as classes. In fact, in previous versions of React, the components were all JavaScript classes. You can still use classes for writing React applications, but it is considered a past approach. The newer approach is using functions. If you hear somewhere about Functional React, that's just React using functions as components instead of classes.
But it's safe to still think of components as classes. I assume that you have already passed some programming courses and are familiar with Object Oriented Programming. An application (let's say a Java application), is usually consisted of multiple classes. And these classes are talking to each other. So, there's always a way for classes to communicate with one another. Components in React are not an exception. React Components, too, need to talk to each other, and the way we accomplish that is with a concept called Props (short for Properties). So, basically, if you want to send something to another Component, you will do so by putting your stuff in Props and then passing the Props to the target class and vice versa.
Here's an example of passing Props to another component:
function Welcome(props) {
  return <h1>Hello, {props.name}</h1>;
}

const element = <Welcome name="Sara" />;
States
States are what keep your React application alive. And by alive, I mean an application that reacts (pun intended) to users' actions. States are different from normal JavaScript variables. For one, we don't update React states directly by the equal sign (=). There are functions coming from the React library that take care of that for us.
But how we can decide between creating a JavaScript variable or a React state? So, basically, if you have a variable that meets the following conditions, you need to create a React state for it:
- Its value changes over time (without refreshing your browser)
- Its value has an impact on the UI (it changes something in the UI)
So, with that definition, if I have a key that I use for calling an API endpoint, I don't need to create a React state for that. It never changes during the lifetime of a webpage. But, if I have a number showing the total number of users registered in my application and the number changes asynchronously (without refreshing the webpage), I should create a React state for that. Why? Because
- It changes
- Its change affects the UI (you're watching the page and then the number goes from 120 to 125. That's a visible change in the UI. You can see it!)
Hooks
When it was just classes in React, there was no Hook. Hooks are a newish addition to React and if you want to write functional React (which we want in this course), you need to learn them. Basically, they are a way to deal with the states of your applications (defining them, changing them, handling them) without using classes.
useState
we use useState to create React states. Take a look at the following example:
import React, { useState } from "react";

function Example() {
  // Declare a new state variable, which we'll call "count"
  const [count, setCount] = useState(0);

  return (
    <div>
      <p>You clicked {count} times</p>
      <button onClick={() => setCount(count + 1)}>Click me</button>
    </div>
  );
}
useState accepts one argument which is the default value of the state being declared (count in the above example), and returns an array of two:
- The state itself
- A function to change the value of the state
The above example uses JavaScript destructuring to get the two values and put them in two variables: count and setCount. We talked about the JavaScript destructuring capability in previous chapters.
useReducer
In the workshops, especially the longer one, I talked about another useful hook that we can use to change a React state. That is the useReducer hook. So, basically, if you have a complicated logic to change your state, you might be better off using useReducer. But if you have a pretty simple logic, like if I click on this button, increase the value of a counter by one, then using useState is enough, although nothing stops you from using useReducer even in this situation.
Here's an example of using useReducer:
const initialState = { count: 0 };

function reducer(state, action) {
  switch (action.type) {
    case "increment":
      return { count: state.count + 1 };
    case "decrement":
      return { count: state.count - 1 };
    default:
      throw new Error();
  }
}

function Counter() {
  const [state, dispatch] = useReducer(reducer, initialState);
  return (
    <>
      Count: {state.count}
      <button onClick={() => dispatch({ type: "decrement" })}>-</button>
      <button onClick={() => dispatch({ type: "increment" })}>+</button>
    </>
  );
}
useEffect
We use useEffect to add side effects to our components. Side effects are what happens when a component renders or re-renders. Components (re-)render in 3 scenarios:
- The first time they load to the page
- Every time their states change
- Every time their props change
We can use useEffect to do some stuff (side effects) after any of the above scenarios. useEffect accepts a function that runs our side effect, along with a dependency array. The dependency array tells useEffect when to re-run the function. useEffect always runs once: when the component is first added to the page; after that, it runs every time the items in the dependency array change. Here are some examples:
// this runs only once the components is added to the page
// since the dependency array is empty
// this is a perfect place to do initializations (reading from database, etc.)
useEffect(() => {
  // function to be executed
}, []);
const [counter, setCounter] = useState(0);
// this runs once the component is added to the page
// + every time "counter" changes
useEffect(() => {
  // function to be executed
}, [counter]);
useRef
We normally don't need to access a DOM element directly in React, as React is declarative, meaning we manage the state of the application and React takes care of updating the DOM for us. But sometimes, we need to still access an element. The React way of doing this, is using the useRef hook. Basically, we create a reference and hook it up to an HTML element. Once the component is added to the page, we can use the current property of the reference to access the element and its properties, like we would in vanilla JavaScript. Here's an example of getting the height of an element, including its padding and borders:
// creating the reference
const ref = useRef(null);

useEffect(() => {
  // this runs after the component is rendered
  // so we have access to the element
  console.log(ref.current.offsetHeight);
}, []);

// hooking up the reference
return <div ref={ref}>some stuff</div>;
React Router
React Router gives you the ability to simulate URL navigations by loading/unloading React components. For example, if the URL is /about, load (show) the About component; if it's /skills, unload the About component and load the Skills component instead.
In order to use React Router, you first need to install it using npm as it doesn't come pre-installed with create-react-app. Make sure you're at the root of your React project and then run:
npm install react-router-dom
You can now use React Router in your project. Create a component named About and another one named Skills:
src/About.js:
function About() {
  return <h1>About</h1>;
}

export default About;
src/Skills.js:
function Skills() {
  return <h1>Skills</h1>;
}

export default Skills;
Then in your App.js file:
src/App.js:
import { BrowserRouter, Routes, Route } from "react-router-dom";
import About from "./About";
import Skills from "./Skills";

function App() {
  return (
    <BrowserRouter>
      <Routes>
        <Route path="/" element={<About />}></Route>
        <Route path="/skills" element={<Skills />}></Route>
      </Routes>
    </BrowserRouter>
  );
}

export default App;
We declared two routes:
/which loads theAboutcomponent/skillswhich loads theSkillscomponent
Run the application. It should show the About component. Add /skills to the end of the URL and you should see the Skills component instead.
Page Parameters
Sometimes, you need to pass a page parameter to a page component. For example, you have a component names User that shows the profile of a specifc user. In order to get their profile, you need a username, which you've decided to get from the URL. For example, the URL yourwebsite.com/users/rick should show the profile of the user rick, and yourwebsite.com/users/alice should show the profile of the user alice. rick and alice are page parameters in this example, like function parameters.
It's not feasible to create a route for every single username you have, therefore you need something more dynamic. That's where page parameters come in. In React Route, you can define page parameters using the :parameter-name syntax inside your path. For example: path="/users/:userId will create a page parameter named userId which you can access using a special hook from React Router named useParams. Let's see an example:
<BrowserRouter>
  <Routes>
    <Route path="/users/:userId" element={<User />}></Route>
  </Routes>
</BrowserRouter>
This will create a route with a page parameter. To access the userId parameter inside the User component:
import { useParams } from "react-router-dom";
// ...
// useParams is an object with properties named after page parameters
// using object destructuring, we can get the parameter we want
const { userId } = useParams();
The Layout Route
More often than not, we want to have the same elements on every page: headers, navigations, footers. Instead of repeating them in all the page components, React Router suggests using a special route, called the Layout Route. The Layout Route is route without any path that wraps one or more routes. All the child routes (components) will then render what the Layout Route (component) has, plus their own stuff. Here's an example:
function App() {
  return (
    <BrowserRouter>
      <Routes>
        <Route element={<Layout />}>
          <Route path="/" element={<About />}></Route>
          <Route path="/skills" element={<Skills />}></Route>
        </Route>
      </Routes>
    </BrowserRouter>
  );
}
It's important to understand that the Layout Route is still a component. Inside the Layout component, we can use the <Outlet /> component from React Router to inject the component that matches the route inside the Layout component. Example:
Layout.js
import { Outlet } from "react-router-dom";

function Layout() {
  return (
    <>
      <header>Header</header>
      <div id="content">
        {/* child components get injected here and replace <Outlet /> */}
        <Outlet />
      </div>
      <footer>Footer</footer>
    </>
  );
}
For instance, if the path is /skills, we will render the Layout component, which will render the Skills component where the <Outlet /> is. It's as if we are rendering this:
<>
  <header>Header</header>
  <div id="content">
    <h1>Skills</h1>
  </div>
  <footer>Footer</footer>
</>
Passing Props to Outlet
We can also pass props to the <Outlet /> component using the context property. Whatever component that replaces <Outlet /> in runtime, will be able to retrieve the props using the useOutletContext hook from React Router. Example:
// inside the Layout component.
//
// if we want to pass more than one element, we need to pass it through an array
<Outlet context={[someParameter, someFunction]} />
// inside the component that replaces Outlet in runtime
//
import { useOutletContext } from "react-router-dom";
// since the context is an array, we can destructure
// to get the items as individual variables
const [someParameter, someFunction] = useOutletContext();
useNavigate
You can use the useNavigate hook to navigate to a different page. This is useful when you want to do some stuff when an event happens (such as clicking a button), and then navigate to a different page afterwards:
import { useNavigate } from "react-router-dom";
const navigate = useNavigate();

const buttonClicked = () => {
  // do some stuff here
  // then go to the home page
  navigate(`/home`);
};
Serverless Architecture with AWS Lambda
Lambda is the Function As A Service (FaaS) offering from AWS. It's a serverless computing offering that lets you run almost any type of code without the need to provision or maintain a server. Lambda is one of the most popular services on AWS and can be hooked up to more than 200 AWS services (including S3, SQS, SNS, and API Gateway) to build a cloud application. Lambda supports several runtimes (languages), including Python, Nodejs, and Go. You can find the full list here.
As Lambda is serverless and there's no server running at all times, we only pay what we use. For instance, if our code takes 2 seconds to run, we (roughly) only pay for 2 seconds. In a traditional approach, a server would be running 24/7 whether or not it was handling any request or workload.
Lambda is great, but nothing is perfect. There are a few limitations with Lambda:
- The maximum timeout for the code to run as a Lambda function is 15 minutes. If your code takes more than that to finish, you can't use a Lambda function
- The deployment package (application code + all the dependencies) cannot be over 50MB in a
.zipformat, and 250MB in an unzipped format. For instance, if you wanted to train a machine learning model, you probably wouldn't be able to do that with a Lambda function. Aside from the fact that most trainings need more than 15 minutes (first limitation), it is very possible that your code plus the libraries you're using (such as tensorflow, keras, pytorch, etc.) will be over 250MB in size - The maximum memory for a Lambda function is 10GB. If your application is memory intensive and needs more than that, you would be better off with other solutions on AWS, such as AWS Batch
The most common way to create a deployment package for Lambda is through S3. We create a deployment package (.zip format) and upload it to an S3 bucket. Then, we reference the package S3 address when we create a Lambda function.
AWS CLI
AWS CLI is a command-line tool that provides an easy interface to interact with AWS services. You can find the method of installation that matches your operating system here.
AWS Vault
AWS Vault is a command-line tool that provides easy and secure access to AWS credentials in development environments. It's a handy tool that lets us work easily with the AWS SDK and other tools that require AWS credentials, such as Terraform. You can find the installation instructions here.
Infrastructure as Code
The idea behind infrastructure as code (IaC) is that you write and execute code to define, deploy, update, and destroy your infrastructure. This represents an important shift in mindset in which you treat all aspects of operations as software—even those aspects that represent hardware (e.g., setting up physical servers). In fact, a key insight of DevOps is that you can manage almost everything in code, including servers, databases, networks, log files, application configuration, documentation, automated tests, deployment processes, and so on.
There are many advantages in using an IaC tool:
- It's repeatable and reusable
- It's easily reversible
- It can be version-controlled
- It can be reviewed and discussed
- It can be automated
- It's a form of documentation out of the box
Popular IaC Tools
| Pulumi | CloudFormation | Heat | Terraform | |
|---|---|---|---|---|
| Source | Open | Closed | Open | Open |
| Cloud | All | AWS | All | All |
| Type | Provisioning | Provisioning | Provisioning | Provisioning |
| Infra | Immutable | Immutable | Immutable | Immutable |
| Paradigm | Declarative | Declarative | Declarative | Declarative |
| Master | No | No | No | No |
| Agent | No | No | No | No |
| Paid Service | Must-have | N/A | N/A | Optional |
| Community | Small | Small | Small | Huge |
| Maturity | Low | Medium | Low | Medium |
Terraform
Terraform is an open-source Infrastructure As Code (IaC) tool that "enables you to safely and predictably create, change, and improve infrastructure". Currently, Terraform is the industry-standard tool when it comes to Infrastructure as Code.
You can install Terraform on all major operating systems for free. Follow the instructions for your operating system here.
Terraform code is written in the HashiCorp Configuration Language (HCL) in files with the extension .tf. It is a declarative language, so your goal is to describe the infrastructure you want, and Terraform will figure out how to create it.
Most of the time, we create resource with Terraform. Here's the syntax:
resource "<PROVIDER>_<TYPE>" "<NAME>" {
  [CONFIG ...]
}
Where the PROVIDER is the plugin you're using (such as, aws); TYPE is the type of resource you want to create (such as, s3_bucket); NAME is the local name you give to the resource; and CONFIG is the arguments specific to the resource. Here's an example of creating an S3 bucket:
# create S3 bucket named "test12345678"
resource "aws_s3_bucket" "site_bucket" {
  bucket = "test12345678"
}
Terraform needs to have access to your AWS credentials. There are several ways to do this. The most common ones are:
Having your credentials as environment variables:
export AWS_ACCESS_KEY_ID=xxxxxxx
export AWS_SECRET_ACCESS_KEY=xxxxxx
Note that this approach only works in your current shell. If you open up a new shell, they'll be gone.
Using AWS Vault
Another way is to use aws-vault which you installed in the previous step.
aws-vault exec <your-aws-vault-profile> -- terraform apply
Useful Terraform Commands
# see the Terraform version
terraform --version

# initialize a provider or module
# you need to run this every time you add a new provider or module
terraform init

# format code
terraform fmt -recursive .

# validate
# this command will check if the syntax is correct
terraform validate

# plan (what will happen if you apply the code)
# this command will not add/remove/alter any resources
# it's just for you to see what WILL happen if you apply the code
terraform plan

# apply
# this will APPLY the code and potentially alter your infrastructure
# Terraform will prompt you once more by default
terraform apply

# destroy
# this command will destroy all the resources created by Terraform
# in the current configuration files
terraform destroy

# show the list of resources created by Terraform
terraform state list

# show all the outputs
terraform output
Create a Lambda Function with Terraform
As we discussed above, we're going to need an S3 bucket to host our Lambda deployment package. Let's create a bucket with Terraform.
Create an S3 Bucket
First, we need to set up the terraform block and specify the provider (in this case, AWS). We then specify the region we want to build the infrastructure in.
main.tf
terraform {
  required_providers {
    aws = {
      version = ">= 4.0.0"
      source = "hashicorp/aws"
    }
  }
}

# specify the provider region
provider "aws" {
  region = "ca-central-1"
}
Now, we need to initialize Terraform, since we added a provider:
terraform init
Terraform will install the AWS plugin as part of the initialization.
Now, we can create our S3 bucket. In the same main.tf file, add:
# S3 bucket
# if you omit the name, Terraform will assign a random name to it
# see the docs: https://registry.terraform.io/providers/hashicorp/aws/latest/docs/resources/s3_bucket
resource "aws_s3_bucket" "lambda" {}

# output the name of the bucket after creation
output "bucket_name" {
  value = aws_s3_bucket.lambda.bucket
}
We can now do aws-vault exec <profile-name> -- terraform plan and then aws-vault exec <profile-name> -- terraform apply to create the bucket. We should be able to see our bucket in the S3 console. If you omitted the bucket name like in the above example, you should see a bucket with a name that starts with terraform.
Application Code
We're going to write very simple Python code as this tutorial is not about Python, but rather, about how to run your code as a Lambda function on AWS. Here's our sophisticated code:
main.py
# the Lambda runtime call a function in our code
# we can name the function anything we want, but it's a best practice
# to include the word "handler".
#
# the function also needs to accept two positional arguments: event and context.
# the Lambda runtime will pass these two arguments when it runs our code.
# we're not doing anything with them here, but they're necessary anyway.
def handler(event, context):
    print("Hello, Lambda!")
Now, we need to package our code and put it in our S3 bucket we created in the previous step. Here's how we can package our code as a .zip file using the zip tool on Unix-based systems:
# this will zip the `main.py` file and name it `artifact.zip`
zip artifact.zip main.py
In case our function has dependencies (external libraries), we need to add them to the deployment package as well. Assuming all the external libraries are listed in the requirements.txt file, here's how we can package them along with the application code:
# we create a new folder named "package" and install the dependecies there.
# we then add our application code (files with the ".py" extension) to the
# zip file
mkdir ./package && pip install -r requirements.txt -t ./package
cd package && zip -r9 ../artifact.zip .
cd ../ && zip -g artifact.zip *.py
We can now push it to our S3 bucket using the AWS CLI:
aws s3 cp artifact.zip s3://<name-of-the-bucket>/hello-world/artifact.zip --profile <your-aws-cli-profile>
Create a Lambda Function
Now that the artifact is in S3, we can continue our Terraform code to create our Lambda function. In the same main.tf file, add the following:
main.tf
# the locals block is used to declare constants that
# you can use throughout your code
locals {
  function_name = "hello-world"
  handler_name  = "main.handler"
  artifact_name = "${local.function_name}/artifact.zip"
}

# create a role for the Lambda function to assume
# every service on AWS that wants to call other AWS services should first assume a role.
# then any policy attached to the role will give permissions
# to the service so it can interact with other AWS services
# see the docs: https://registry.terraform.io/providers/hashicorp/aws/latest/docs/resources/iam_role
resource "aws_iam_role" "lambda" {
  name               = "iam-for-lambda-${local.function_name}"
  assume_role_policy = <<EOF
{
  "Version": "2012-10-17",
  "Statement": [
    {
      "Action": "sts:AssumeRole",
      "Principal": {
        "Service": "lambda.amazonaws.com"
      },
      "Effect": "Allow",
      "Sid": ""
    }
  ]
}
EOF
}

# create a Lambda function
# see the docs: https://registry.terraform.io/providers/hashicorp/aws/latest/docs/resources/lambda_function
resource "aws_lambda_function" "lambda" {
  s3_bucket     = aws_s3_bucket.lambda.bucket
  s3_key        = local.artifact_name
  role          = aws_iam_role.lambda.arn
  function_name = local.function_name
  handler       = local.handler_name

  # see all available runtimes here: https://docs.aws.amazon.com/lambda/latest/dg/API_CreateFunction.html#SSS-CreateFunction-request-Runtime
  runtime = "python3.9"
}

# create a policy for publishing logs to CloudWatch
# see the docs: https://registry.terraform.io/providers/hashicorp/aws/latest/docs/resources/iam_policy
resource "aws_iam_policy" "logs" {
  name        = "lambda-logging-${local.function_name}"
  description = "IAM policy for logging from a lambda"

  policy = <<EOF
{
  "Version": "2012-10-17",
  "Statement": [
    {
      "Action": [
        "logs:CreateLogGroup",
        "logs:CreateLogStream",
        "logs:PutLogEvents"
      ],
      "Resource": "arn:aws:logs:*:*:*",
      "Effect": "Allow"
    }
  ]
}
EOF
}

# attach the above policy to the function role
# see the docs: https://registry.terraform.io/providers/hashicorp/aws/latest/docs/resources/iam_role_policy_attachment
resource "aws_iam_role_policy_attachment" "lambda_logs" {
  role       = aws_iam_role.lambda.name
  policy_arn = aws_iam_policy.logs.arn
}
Run aws-vault exec <profile-name> --no-session -- terraform apply to create the Lambda function. You can now head to the Lambda console and test your function. Note the --no-session in the command. This is because AWS doesn't allow creating IAM roles with an assumed role, which is basically what AWS Vault does in the background.
Here's the final Terraform file:
{{< gist masoudkarimif d2c7af419b5dd700ec91a3c8d17ef5a8 >}}
Cleaning Up
Note that this infrastructure doesn't cost you anything if you don't invoke your Lambda function many many times as the AWS Lambda free tier includes one million free requests per month and 400,000 GB-seconds of compute time per month. But if you want to delete all the resources you created, here's how you can do it:
Empty the Bucket
Terraform will not delete your S3 bucket as long as it contains some stuff (in this case, the artifact.zip file). So, you need to empty your bucket first. You can do that using the AWS CLI:
aws s3 rm --recursive s3://<bucket-name> --profile <profile-name>
Now, Terraform can delete all the resources you created with it. Simply run:
aws-vault exec <profile-name> -- terraform destroy
When prompted, answer yes and Terraform will delete everything for you.
DynamoDB
DynamoDB is a fully managed, high-performance, NoSQL database service provided by AWS. It is designed to provide fast and predictable performance with seamless scalability. DynamoDB is a non-relational database that allows users to store and retrieve data, while maintaining low latency and high availability. DynamoDB is a schema-less database, which means that users can store data in any format without defining a schema beforehand.
DynamoDB stores data in tables. All tables must either have a Primary Key (also known as Partition Key), or a Primary Key and a Sort Key (also known as composite key). In a table that has only a partition key, no two items can have the same partition key value. In a table that has a partition key and a sort key, it's possible for multiple items to have the same partition key value. However, those items must have different sort key values.
Perhaps the most important limitation of DynamoDB is that no item in a table can exceed 400KB. If you have a use case that requires storing items bigger than 400KB, you may want to use a relational database offering from AWS, such as MySQL with AWS RDS, or use a more creative approach of DynamoDB + S3, where you store the index of a file in DynamoDB (which is not going to exceed 400KB) and the data itself in S3 where any individual file can be up to 5TB.
DynamoDB Data Types
-
Scalar Types: A scalar type can represent exactly one value. The scalar types are number, string, binary, Boolean, and null.
-
Document Types: A document type can represent a complex structure with nested attributes, such as you would find in a JSON document. The document types are list and map.
Create a DynamoDB Table with Terraform
{{< gist masoudkarimif b0738cc57bcbf558970aaa77bd118d36>}}
Boto3
AWS Boto3 is a Python software development kit (SDK) that enables developers to write Python scripts and applications to interact with various AWS services programmatically. Boto3 allows developers to use Python code to interact with AWS resources instead of logging into the AWS Management Console or using command-line tools.
Boto3 and DynamoDB
You can use Boto3 to interact with DynamoDB. Here's an example of CRUD (Create, Read, Update, and Delete) operations on the students table we created earlier:
main.py
import boto3

# create a dynamodb resource
dynamodb_resource = boto3.resource("dynamodb")
# create a dynamodb table object
table = dynamodb_resource.Table("students")


def add_item(student):
    # read the docs: https://boto3.amazonaws.com/v1/documentation/api/latest/reference/services/dynamodb/table/put_item.html
    return table.put_item(Item=student)


def get_item(student_id):
    # read the docs: https://boto3.amazonaws.com/v1/documentation/api/latest/reference/services/dynamodb/table/get_item.html
    response = table.get_item(Key={"student_id": student_id})
    item = response["Item"]
    return item


def update_item(student):
    # read the docs: https://boto3.amazonaws.com/v1/documentation/api/latest/reference/services/dynamodb/table/update_item.html
    return table.update_item(
        Key={
            "student_id": student["student_id"],
        },
        UpdateExpression="SET grades = :grades",
        ExpressionAttributeValues={":grades": student["grades"]},
    )


def delete_item(student_id):
    # read the docs: https://boto3.amazonaws.com/v1/documentation/api/latest/reference/services/dynamodb/table/delete_item.html
    return table.delete_item(
        Key={
            "student_id": student_id,
        }
    )
And some tests to make sure our functions work properly:
test_main.py
from main import *
import time

# item for testing
item = {
    "student_id": 3098390,
    "first_name": "Alice",
    "last_name": "Wonderland",
    "grades": [90, 85, 100, 94],
}


# run pytest -v -k 'test_add' to run this specific test
def test_add_item():
    res = add_item(item)
    assert res is not None


# run pytest -v -k 'test_get' to run this specific test
def test_get_item():
    res = get_item(item["student_id"])
    assert res is not None
    assert res["first_name"] == item["first_name"]
    assert res["last_name"] == item["last_name"]
    assert res["grades"] == item["grades"]


# run pytest -v -k 'test_update' to run this specific test
def test_update_item():
    updated_item = {"student_id": 3098390, "grades": [90, 100, 100, 100]}
    res = update_item(updated_item)
    assert res is not None
    # sleep for 1 second to make sure the updated record is consistent across all AZs
    time.sleep(1)
    res = get_item(updated_item["student_id"])
    assert res["grades"] == updated_item["grades"]


# run pytest -v -k 'test_delete' to run this specific test
def test_delete_item():
    res = delete_item(item["student_id"])
    assert res is not None
To run the test cases using pytest, first make sure you have pytest installed (pip install pytest). You can then use pytest -v to run all the tests in the order they are declared in the file. The gotcha here is that because you're interacting with AWS, you need to have proper credentials to run the tests. AWS Vault to the rescue:
aws-vault exec <profile-name> -- pytest -v
Building APIs
So, you created a Lambda function and now want to use it in your application which will be publicly available? You need to find a way to expose it to the world.
Although the go-to service for exposing Lambda functions to the public Internet is AWS API Gateway, the service does have a learning curve, and it takes some time to properly set it up.
If you want to quickly test your Lambda function and don't want to go through the whole APIGW setup, you can use Function URLs. Function URLs are a rather new feature with Lambda that let you assign an HTTPS endpoint to your Lambda function for invokation. It's also free and you only pay for the Lambda usage.
The advantages of using Function URLs over API Gateway are:
- Ease of use
- Cost
- Speed of development
However, API Gateway comes with great features such as Usage Plans, API Keys, Cognito Authentication, Request Throttling, and Caching.
Lambda Function URL with Terraform
Here, we create a simple Lambda function with Python that returns the HTTP method it was invoked with, plus the name of the invoker. Let's start with our function code:
main.py
import json

def lambda_handler(event, context):
    print(event)
    http_method = event["requestContext"]["http"]["method"].lower()
    invoker = None

    if http_method == "post" or http_method == "put":
        # POST and PUT use the request body to get info about the request
        body = json.loads(event["body"])
        invoker = body["invoker"]
    elif http_method == "get" or http_method == "delete":
        # GET and DELETE use query string parameters to get info about the request
        invoker = event["queryStringParameters"]["invoker"]

    return {
        "statusCode": 200,
        "body": json.dumps({
            "method": http_method,
            "invoker": invoker
        })
    }
How do I know about the request structure? There answer's here. Function URL uses API Gateway version 2.0 payload type, which is like this:
{
"version": "2.0",
"routeKey": "$default",
"rawPath": "/my/path",
"rawQueryString": "parameter1=value1¶meter1=value2¶meter2=value",
"cookies": ["cookie1", "cookie2"],
"headers": {
"header1": "value1",
"header2": "value1,value2"
},
"queryStringParameters": {
"parameter1": "value1,value2",
"parameter2": "value"
},
"requestContext": {
"accountId": "123456789012",
"apiId": "api-id",
"authentication": {
"clientCert": {
"clientCertPem": "CERT_CONTENT",
"subjectDN": "www.example.com",
"issuerDN": "Example issuer",
"serialNumber": "a1:a1:a1:a1:a1:a1:a1:a1:a1:a1:a1:a1:a1:a1:a1:a1",
"validity": {
"notBefore": "May 28 12:30:02 2019 GMT",
"notAfter": "Aug 5 09:36:04 2021 GMT"
}
}
},
"authorizer": {
"jwt": {
"claims": {
"claim1": "value1",
"claim2": "value2"
},
"scopes": ["scope1", "scope2"]
}
},
"domainName": "id.execute-api.us-east-1.amazonaws.com",
"domainPrefix": "id",
"http": {
"method": "POST",
"path": "/my/path",
"protocol": "HTTP/1.1",
"sourceIp": "192.0.2.1",
"userAgent": "agent"
},
"requestId": "id",
"routeKey": "$default",
"stage": "$default",
"time": "12/Mar/2020:19:03:58 +0000",
"timeEpoch": 1583348638390
},
"body": "Hello from Lambda",
"pathParameters": {
"parameter1": "value1"
},
"isBase64Encoded": false,
"stageVariables": {
"stageVariable1": "value1",
"stageVariable2": "value2"
}
}
Now, let's create a Lambda function off of the main.py file we wrote earlier:
main.tf
{{< gist masoudkarimif 00fb0872190b7ddb04e32b281d784c9e>}}
Apply the Terraform configuration using aws-vault:
aws-vault exec <profile-name> --no-session -- terrform apply
If successful, you should get the function URL as an output. You can now use the endpoint--which is in the format of https://<url-id>.lambda-url.<region>.on.aws--to send requests.
I use curl to send requests with different HTTP methods to Lambda:
Get
Request:
curl <endpoint>?invoker=batman
Response:
{ "method": "get", "invoker": "batman" }
POST
Request:
curl -X POST <endpoint> --data '{"invoker": "batman"}' --header "Content-Type: application/json"
Response:
{ "method": "post", "invoker": "batman" }
PUT
Request:
curl -X PUT <endpoint> --data '{"invoker": "batman"}' --header "Content-Type: application/json"
Response:
{ "method": "put", "invoker": "batman" }
DELETE
Request:
curl -X DELETE <endpoint>?invoker=batman
Response:
{ "method": "delete", "invoker": "batman" }
Scheduling Tasks
"EventBridge is a serverless service that uses events to connect application components together." Most AWS services dispatch events in different situations. For instance, ECS dispatches an event when a task starts and Batch dispatches an event when a job succeeds or fails. With EventBridge, we can react to these events and build what they call an Event-driven architecture: a system that generates and reacts to certain events. For instance, we can invoke a Lambda function when a Batch job fails.
But besides events generated from AWS services, we can also create our own events that happen on a pre-defined schedule:
- an event that happens every hour at the 15 minutes of the clock (1:15, 2:15, ...)
- and event that happens every Friday at midnight
- ...
These events, just like the events emitted from AWS services, can be hooked up to a Lambda function. Therefore, we can run our Lambda function automatically based on a schedule. The most popular type of defining a schedule is via cron expressions. cron is a tool available on Unix-based systems that enable users to schedule a job. It has a certain format that must be followed:
<minute> <hour> <day-of-month> <month> <day-of-week>
The cron format on AWS, however, has an extra field at the end that defines the year:
<minute> <hour> <day-of-month> <month> <day-of-week> <year>
Explaining the cron syntax is not what this post is about. You can play around with it here, though.
Shedule a Lambda Function with EventBridge using Terraform
Here, we create a Lambda function and have EventBridge invoke it every 5 minutes:
{{< gist masoudkarimif 8e07ee483328112dbd27b930b3250475>}}
Hosting Static Websites
Amazon S3 is a great storage for your files. You can upload your files to what is known as a bucket and then access later. You can also have folders in your bucket to organize your files. Just think of a bucket as a root folder for your files in the cloud. It's more complicated than that, but I think it will suffice for now. And of course, you can have multiple buckets.
One of the great things about S3 is that it can host your static website. You'll put your files in a bucket, and with a few steps, bam! You've got yourself a static website with an actuall address publicly accessible on the Internet. And it's very cheap; especially if you're eligible for AWS free usage tier which you'll get once you open an account for a year. You can check the pricing here. Just remember, we'll be using S3 Standard since we want high availability for our website. Enough with this. Let's talk about how to host a static website using AWS S3. Before we start, there are some prerequisites:
- An AWS account. In case you don't have it already, start here
- An IAM user with AdministratorAccess. Follow these instructions for creating one (the user doesn't actually have to be an admin user; but specifying fine-grained policies for a user is not something this tutorial is about. So, admin it is!)
- AWS CLI installed and configured on your machine. This is the AWS Command Line Interface which we'll be using throughout this tutorial. Follow these instructions for your operating system if you don't already have it
All right. Let's do this. But before we start, I should point out that this tutorial is all about the command line. You can definitely do all of these steps using the AWS web console; however, we're not going to do that here. All right, let's begin now. First we want to create an S3 bucket. Open up your terminal and type this command. We use mb for make bucket:
aws s3 mb s3://myfantasticwebsite
Pay attention to the s3:// prefix; it's important that you use it, otherwise the AWS CLI will yell at you. myfantasticwebsite is the name of your bucket and it will appear as part of your website address later on. Another thing, once you've created a bucket you can't change its name, so choose it wisely. Also, the name of your bucket must be unique through the entire AWS system, so you will get an error if your chosen name already exists. You can now go to the S3 console and see your bucket sitting there. Well done!
However, this bucket is not yet ready to host a static website. For one, this bucket, by default, is not publicly accessible. That's against the core principle of a website that should be accessible by everybody. You can test this by first creating an HTML file and then upload it to your bucket. Let's do it:
<p>Hello from AWS S3</p>
This is like the most simple HTML file ever; but it doesn't matter for now. Let's upload it to our bucket:
aws s3 cp index.html s3://myfantasticwebsite
Remember that the index.html file should be in your current directory. Otherwise, you'll have to address it differently. Now head back to the console and go to your bucket. You'll see that your index.html file is there. Click on the file and on the next page, you'll find a URL under Object URL. That's the URL to your file. Click on it, and ... Yes, you'll be presented by an AccessDenied page. Why? Because the file is not publicly available yet. It's private and just you, as the bucket owner, can access it. Let's fix this.
In order to make your objects (your files in the bucket) publicly accessible, you'll need something known as the Bucket Policy. It's a JSON file in which you'll specify how you want your objects to be accessed. Let's create this file for our static website:
{
    "Version": "2012-10-17",
    "Statement": [
        {
            "Sid": "PublicReadForMyStaticWebsite",
            "Effect": "Allow",
            "Principal": "*",
            "Action": "s3:GetObject",
            "Resource": "arn:aws:s3:::myfantasticwebsite/*"
        }
    ]
}
Here, Version is not the version of your website or file or anything. It's the version of this JSON structure provided by Amazon. In the future, Amazon might present a new structure for bucket policies and we'll have to use that. So, don't worry about it. The Sid part is optional and you can name it whatever you want. The Principal part indicates who this policy will be applied to--in this case, it's everyone. The Action part is the action you want to give to your principals, and the Resource is every object (file) in our bucket. Note the name of the bucket and the /* which means everything in this bucket.
Go Ahead and save this file with the name policy.json in the current directory. Then open up your terminal or command line again and put this:
aws s3api put-bucket-policy --bucket myfantasticwebsite --policy file://policy.json
Note that we used s3api instead of s3 here and didn't use the s3:// prefix. We also had to use the file:// prefix for the JSON file. Now once again, go ahead to your bucket, click on the html file, click on the Object URL link and bam! You can now see your HTML file in the browser. How cool is this?
As cool as this is, it's not still a website as we normally know it. True, you now have a URL to your index.html and can pass it on to everyone and they can in fact access it on the Internet. But it's not a website. For one, just try deleting the /index.html part of the URL, because no one accesses a website with a /index.html at the end, right? Now try to render the page. You'll, of course, get another Access Denied page. For another, try putting a non-existent address, like <YOUR_DOMAIN_WITHOUT_INDEX.HTML_AT_THE_END>/somethingdummy and reload the page. You'll again get the Access Denied page, where, normally, you would expect to see a 404 page! So, it feels like a website, but it's not. Let's fix this.
In order to fix this issue, we need another JSON file that represents very basic website characteristics: index.html and 404 pages. Let's create the JSON file:
{
    "IndexDocument": {
        "Suffix": "index.html"
    },
    "ErrorDocument": {
        "Key": "404.html"
    }
}
This is a very basic configuration that says, "OK, my index is index.html and my error page is 404.html". Remember to create a 404.html page. For simplicity sake, let's create a very simple 404.html page:
<p>Page not found!</p>
Save the JSON file as webconfig.json in the current directory, then open your terminal again and put this:
aws s3api put-bucket-website --bucket myfantasticwebsite --website-configuration file://webconfig.json
Your website is ready now, but a new address has been created. Head back to S3 console, go to your bucket and from the top menu, select Properties. You'll see a box named Static website hosting and it should be checked since we've already configure it. Click on it and you'll see your configuration there: index.html as the Index document and 404.html as the Error document. On the top, you'll see a link named Endpoint. Click on the link, and voila... You've got yourself a static website. And this is actually a website. It doesn't need the /index.html and if you try accessing a page that doesn't exist, you'll get your 404 page.
The address is not very appealing, I know. But if you have a domain name, you can change your DNS settings to point to this address. You can also get an SSL certificate for your static website hosted in a S3 bucket using another AWS service called CloudFront. It's kind of beyond the scope of this post--It's already very long. But I will create another post and show you how you can achieve these things.
Wordle
In this assignment, you will create a Wordle game with HTML, CSS, and JavaScript. To get a feeling of how it works, watch a recording of the game on D2L attached to the assignment. Also, make sure you read the Notes at the end of this page.
Steps
- Add your HTML code to the index.html file
- Add your CSS code to the style.css file
- Add your JavaScript code to the wordle.js file
- Push your changes to the remote
mainbranch
Notes
-
The page reads a dictionary of words from this endpoint:
https://api.masoudkf.com/v1/wordle. The endpoint requires an API key (sw0Tr2othT1AyTQtNDUE06LqMckbTiKWaVYhuirv). You can usefetchand add the key like the following:const res = await fetch("https://api.masoudkf.com/v1/wordle", { headers: { "x-api-key": "sw0Tr2othT1AyTQtNDUE06LqMckbTiKWaVYhuirv", }, }); -
Here's a sample response of what the endpoint returns. It returns a
JSONobject. You don't need to be concerned about thestatusCodeproperty; what you want isdictionary:{ "statusCode": 200, "dictionary": [ { "word": "Pain", "hint": "Attending any class other than ENSF 381 gives you ____" }, { "word": "Nerd", "hint": "You may be considered one, if you like Star Trek" } ] } -
Unlike the original Wordle game, you don't need to check if the word exists in the dictionary
-
You only read from the endpoint once per page refresh. Hitting the
Start Overbutton shouldn't send another request if the user hasn't refreshed the page. It only picks a random new word from the already-loaded dictionary. You can generate a random number between 0 and N using the following code:Number.parseInt(Math.random() * N) -
The
Start Overbutton should becomedisabledwhile the code is getting the dictionary from the endpoint for the first time, and sayLoading... -
You need to capture key events from the user and populate the boxes. The key event used in the demo is
keyup, and the boxes are marked up using thetableelement. But feel free to change that -
Users can use the
Backspacekey to remove characters from the word -
Users must use the
Enterkey to submit an answer. On Mac OS, the key is calledReturn, but the key code is the same -
If a user hits the
Enterkey while the word is not complete, the page should alert the user to finish the word first. You can usewindow.alert("first complete the word")for this -
After a word submission:
- Letters in the right spot should get a green background
- Letters in the word but in the wrong spot should get a yellowish background
- Letters not in the word should get a gray background
-
At any time in the game, users can use the
?icon on the menu to see a hint about the word. This hint is part of the dictionary returned from the endpoint -
When a user wins, the page should show a congratulation image. You can find the one used in the demo here
-
When a user loses, they should get a message with a red background saying they couldn't guess the word and lost
-
The
iicon in the menu shows the game instructions -
The Moon icon in the menu can toggle the page from Light to Dark theme
-
I didn't use any CSS framework for the layout, but feel free to use one if you want
-
The icons on the menu are HTML characters (
◑for the Dark Mode icon;?for the Hint icon; andⓘfor the Game Instructions icon) -
You're only allowed to use vanilla JavaScript (JavaScript without any external libraries, such as React) for this assignment
Lotion
In this assignment, you will create a Notion-like application named Lotion with HTML, CSS, and React.
Steps
- Clone the repo
- Make sure you're inside the root directory of the repo and then run
npm installto install all the necessary packages - Run
npm startand you should be able to see the page open up on your default browser - Make sure to see the demo video on D2L
- Make your changes and push to the
mainbranch before the deadline to be graded - Create a new repo under your username and add it as a new remote to the project:
git remote add personal <github-address> - Push your changes to your personal repo as well:
git push personal main - Use Netlify to deploy your application and drop the link to your website in the NETLIFY-ADDRESS file
Notes
-
Three external libraries were used for the demo:
react-router-domfor front-end routing, which you can install by runningnpm install react-router-dom. Read more herereact-quillfor the editor, which you can install by runningnpm install react-quill. Read more hereuuidfor generating universally unique identifiers, which you can install by runningnpm install uuid. Read more here. Based on the algorithm you choose to implement the application, you may not need this library
-
There's no backend or database for the application. However, the data persists in the browser. You need to use
localStorageto implement this. Read more here on how to use it -
Three different React hooks were used to build the demo:
-
The demo uses a Layout route. Read more here
-
You need to use a page parameter to pass the note id to the component:
/notes/1,/notes/2/edit. Read more here -
Based on your solution, you probably need to pass props to the child/children of the Layout component. Read more here
-
You need to use the
useParamsanduseOutletContexthooks from thereact-router-domlibrary to access the page parameters and the data passed to the children of the Layout component. Read more here and here -
You probably need to use the
useNavigatehook from thereact-router-domlibrary to navigate to a different page at times. (hint: when you edit a note and hit save, you navigate from the edit path/notes/note-id/editto the view path/notes/note-id). Read more here -
The prompt you get when click on the Delete button is implemented using the
window.confirmmethod. It returnstrueif the user confirms, andfalseif they don't:const answer = window.confirm("Are you sure?"); if (answer) { deleteNote(noteId); } -
The page icon (the L letter) is already included in the project
-
The demo was built using Flexbox, but feel free to use a CSS framework
-
The menu icon is the HTML unicode character
☰ -
The datetime picker shown in the demo is the
<input type="datetime-local" />HTML element -
The value you get from the
datetime-localelement is not formatted the way it's shown in the demo. In order to format it, you can use a function like this:const options = { year: "numeric", month: "long", day: "numeric", hour: "numeric", minute: "numeric", }; const formatDate = (when) => { const formatted = new Date(when).toLocaleString("en-US", options); if (formatted === "Invalid Date") { return ""; } return formatted; };
Things you may change
- You may use a CSS framework or a different CSS method other than Flexbox. The final result needs to look like the demo
- You may change the colors, font family, and font size
- You may use a different library for the editor. The demo uses the
react-quilllibrary - You may use a different library for the routing. The demo uses the
react-router-domlibrary - You may use a different library for generating ids. The demo uses the
uuidlibrary. You may also choose not to use a library for this based on your solution. If your solution doesn't need a UUID, it doesn't mean it's wrong
Things you may not change (points will be deducted if you do)
- The general layout including all the buttons
- The routing. The application needs to use front-end routing to show or edit a note
- The
localStorage. The application needs to use the browser storage to persist the data - The editor. There needs to be a text editor to write a note
- The deployment. The application needs to be deployed on Netlify the way we saw in the class
Bonous points
- Tags. They need to be searchable. That is, when a user is picking a tag for a note, the application should suggest similar tags
- Sorting and searching for the notes
Lotion Plus (Final)
In this assignment, you will create a backend on AWS for the Lotion app you created in a previous assignment. You will use Terraform for creating resources on AWS.
You may use the front-end you built in the previous assignment here if it works properly. If not, you need to make sure it does by the time you demo your work.
Architecture Overview

Steps
- Make sure to see the demo video on D2L
- Clone the repo
- Make sure you're inside the root directory of the repo and then run
npm installto install all the necessary packages - Run
npm startand you should be able to see the page open up on your default browser - Add your infrastructure code in the
main.tffile - Add your function code for the
get-notesfunction in thefunctions/get-notes/main.pyfile - Add your function code for the
save-notefunction in thefunctions/save-note/main.pyfile - Add your function code for the
delete-notefunction in thefunctions/delete-note/main.pyfile - Push your changes to the
mainbranch before the deadline to be graded - Create a new PRIVATE repo under your username and add it as a new remote to the project:
git remote add personal <github-address>. This could be the same repo you used for the previous assignment. You don't have to create a new one. I say PRIVATE in case you accidentally put some sensitive information in your repo (e.g. AWS Credentials. DON'T DO THAT!!) - Push your changes to your personal repo as well:
git push personal main - Use Netlify to deploy your application and drop the link to your website in the NETLIFY-ADDRESS file
Notes
-
You must use Google as the login method for the app. The demo uses the
@react-oauth/googlelibrary. To use Google as a login method, you need to create a project on Google Cloud Platform first and use theclient_idyou generate in your app. See this tutorial on how to create such a project and connect it to your React app. It's Free, but you need to put in credit card info to create a Google Cloud account -
You must create all your resources on AWS with Terraform. Put all your configuration in the
main.tffile -
You must use AWS DynamoDB for the database. Feel free to use the same setup (Partition and Sort Key) shown in the Demo. The demo uses a table named
lotion(you must name your tablelotion) withemailas Partition Key and noteidas Sort Key. This is an easy setup which will let you store everybody's notes in one table and retrieve/update/delete them easily. Note that if you use this method, you need to use the DynamoDB Query operation to retrieve all the notes for a user -
You must use Lambda Function URLs for this assignment to connect your backend to the frontend
-
You must create 3 Lambda functions for this assignment:
get-notes: to retrieve all the notes for a user. The function reads the user email from the query parameteremail, and receivesemailandaccess_token(this is the token you get from the Google login library) in the headers. Function URL only allowsGETrequestssave-note: to save/create/update a note for a user. The function reads the note to be saved/created/updated from the body of the request, and receivesemailandaccess_tokenin the headers. Function URL only allowsPOSTrequestsdelete-note: to delete an existing note for a user. The function reads the user email from the query parameteremail, and receivesemailandaccess_tokenin the headers. Function URL only allowsDELETErequests
-
You need to use the
emailandaccess_tokenyou get in the headers of the requests to make sure the user is authenticated properly. If not, the functions should return the HTTP status code401for unauthenticated requests -
In order to get the full mark, you need to DEMO your work in PERSON.
Things you may change
- You may use a different library for Google authentication
- You may use a CSS framework to build the UI
- You may choose either Python or Golang to write your Lambda functions
AWS Cost
- This assignment won't cost you anything if you follow the best practices discussed in the class
- Use the
PROVISIONEDbilling mode, and only 1 RCU and WCU for your DynamoDB table as shown in the lecture notes - Don't use a memory configuration bigger than 128MB for your Lambdas. Use the lecture notes to create Lambda functions. When you don't specify the
memory_sizefield, it will default to 128MB which is the minimum amount - Don't send a huge number of requests to your Lambdas using automated scripts. You have 1 Million free requests, and up to 3.2 million seconds of free compute time under the Free Tier
- Remember to enable Free Tier notifications on your account before building anything as shown in the videos on D2L
- If you go over the Free Tier (you would have to screw it up really bad, honestly), you can create a new Free AWS account and build your infrastructure there instead. Thankfully, Terraform makes that process super easy for you